Quantcast
Channel: Desert Home
Viewing all 218 articles
Browse latest View live

Hacking Into The Iris Door Sensor, Part 4, Resolution

$
0
0
The previous post on this project is here <link>.

Well, my partner in questionable activity in hacking the Iris Contact Switch and Key Fob has gotten his devices to work as well as mine, so it's time to close this project off for a while.

The reason my setup worked well and his didn't was because he didn't have a router on his network of Iris devices and I did. The Iris Smart Switch is a router and I have a handful of them scattered around the house. When he plugged one in and tried the devices, his started working and away he went. I just got word that he is switching his network over to completely local control.

Why is a router necessary? Frankly, I'm not sure at this point and I'll check into it more over time, but I have a couple of door switches working quite well, and the key fob controlling one of my smart switches. The system works nicely.

Between the two of us we managed to decode the various timers and such so you folk can pick up where we left off and implement these little devices in your own home for whatever you want. Nicely made (physically) product that was hampered only by the special code Iris put in them to force you to use their hub. I don't know why manufacturers insist on doing that, especially since there are folk like me that will take it as a challenge.

Here's the latest code with the various items. It will support the Iris smart switch, Key Fob and Door Switch. The code doesn't save status to a data base, or forward it to anything else, it just joins the devices and watches them; you'll need to adapt it to what you want to do.

#! /usr/bin/python
'''
Hacking into the iris door sensor
Have fun
'''
from xbee import ZigBee
import datetime
import time
import serial
import sys, traceback
import shlex
import Queue
from struct import *
import binascii
import inspect


# line number for debugging
def getLineNumber():
return inspect.stack()[1][2]

# show data formatted so I can read it
def showData(data):
print "********** Message Contents"
for key, value in data.iteritems():
if key == "id":
print key, value
else:
print key, "".join("%02x " % ord(b) for b in data[key])
print "**********"

def showClusterData(lAddr,sAddr, clusterId, data):
print int(time.time()),
print "".join("%02x" % ord(b) for b in lAddr) + \
"" + \
"".join("%02x" % ord(b) for b in sAddr) + \
" clid "+"%04x" % clusterId + "-" + \
"".join("%02x " % ord(b) for b in data)

# this is a call back function for XBee receive.
# When a message comes in this function will
# get the data.
# I had to use a queue to make sure there was enough time to
# decode the incoming messages. Otherwise, in heavy traffic
# periods, I'd get a new message while I was still working on
# the last one.
def messageReceived(data):
#print "queueing message"
messageQueue.put(data)

def handleMessage(data):
try:
# if data['source_addr_long'] not in \
# ['\x00\x0d\x6f\x00\x04\x51\x07\x82',]:
# return
#print 'gotta packet'
#showData(data)
if (data['id'] == 'rx_explicit'):
#print "RX Explicit"
#showData(data)
clusterId = (ord(data['cluster'][0])*256) + ord(data['cluster'][1])
#print 'Cluster ID:', hex(clusterId),

if (data['profile']=='\x00\x00'): # The General Profile
print 'Cluster ID:', hex(clusterId),
print "profile id:", repr(data['profile'])
if (clusterId == 0x0000):
print ("Network (16-bit) Address Request")
#showData(data)
elif (clusterId == 0x0004):
# Simple Descriptor Request,
print("Simple Descriptor Request")
#showData(data)
elif (clusterId == 0x0005):
# Active Endpoint Request,
print("Active Endpoint Request")
#showData(data)
elif (clusterId == 0x0006):
print "Match Descriptor Request"
'''
the switch looks for clusters under profile
c216, and I respond with only 1 cluster 02
'''
showData(data)
time.sleep(2)
print "Sending match descriptor response"
zb.send('tx_explicit',
dest_addr_long = data['source_addr_long'],
dest_addr = data['source_addr'],
src_endpoint = '\x00',
dest_endpoint = '\x00',
cluster = '\x80\x06',
profile = '\x00\x00',
options = '\x01',
data = data['rf_data'][0:1] + '\x00\x00\x00\x01\x02'
)
# The contact switch is a bit slow, give it
# some time to digest the messages.
time.sleep(2)
zb.send('tx_explicit',
dest_addr_long = data['source_addr_long'],
dest_addr = data['source_addr'],
src_endpoint = '\x02',
dest_endpoint = '\x02',
cluster = '\x00\xf6',
profile = '\xc2\x16',
data = '\x11\x01\xfc'
)
time.sleep(2)
elif (clusterId == 0x0008):
# I couldn't find a definition for this
print("This was probably sent to the wrong profile")
elif (clusterId == 0x13):
# This is the device announce message.
print 'Device Announce Message'
# this will tell me the address of the new thing
# so I'm going to send an active endpoint request
print 'Sending active endpoint request'
epc = '\xaa'+data['source_addr'][1]+data['source_addr'][0]
print "".join("%02x " % ord(b) for b in epc)
zb.send('tx_explicit',
dest_addr_long = data['source_addr_long'],
dest_addr = data['source_addr'],
src_endpoint = '\x00',
dest_endpoint = '\x00',
cluster = '\x00\x05',
profile = '\x00\x00',
options = '\x01',
data = epc
)
elif (clusterId == 0x8000):
print("Network (16-bit) Address Response")
#showData(data)
elif (clusterId == 0x8005):
# this is the Active Endpoint Response This message tells you
# what the device can do, but it isn't constructed correctly to match
# what the switch can do according to the spec. This is another
# message that gets it's response after I receive the Match Descriptor
print 'Active Endpoint Response'
# elif (clusterId == 0x0006):
elif (clusterId == 0x8038):
print("Management Network Update Request");
else:
print ("Unimplemented Cluster ID", hex(clusterId))
print
elif (data['profile']=='\xc2\x16'): # Alertme Specific
if (clusterId == 0xee):
clusterCmd = ord(data['rf_data'][2])
status = ''
if (clusterCmd == 0x80):
if (ord(data['rf_data'][3]) & 0x01):
status = "ON"
else:
status = "OFF"
elif (clusterId == 0xef):
clusterCmd = ord(data['rf_data'][2])
status = data['rf_data'] # cut down on typing
if (clusterCmd == 0x81):
usage = unpack('<H', status[3:5])[0]
elif (clusterCmd == 0x82):
usage = unpack('<L', status[3:7])[0] / 3600
upTime = unpack('<L', status[7:11])[0]
#print ("%s Minute Stats: Usage, %d Watt Hours; Uptime, %d Seconds" %(name, usage/3600, upTime))
elif (clusterId == 0xf0):
showClusterData(data['source_addr_long'],data['source_addr'],clusterId,data['rf_data'])
# If the cluster cmd byte is 'xfb', it's a status
if data['rf_data'][2] == '\xfb':
status = data['rf_data'] # just to make typing easier
if status[3] == '\x1f':
print " Door Sensor",
print str(float(unpack("<h", status[8:10])[0])\
/ 100.0 * 1.8 + 32) + "F",
if ord(status[-1]) & 0x01 == 1:
print "reed switch open",
else:
print "reed switch closed",
if ord(status[-1]) & 0x02 == 0:
print "tamper switch open",
else:
print "tamper switch closed",

elif status[3] == '\x1c':
# Never found anything useful in this
print "Power Switch",
elif status[3] == '\x1d':
print " Key Fob",
print str(float(unpack("<h", status[8:10])[0])\
/ 100.0 * 1.8 + 32) + "F",
unpack('<I',status[4:8])[0]
print 'Counter', unpack('<I',status[4:8])[0],
elif status[3] == '\x1e':
# This indicates a door sensor
# with an invalid temperature reading
# the other items are OK
print " Door Sensor",
print "Temperature invalid",
if ord(status[-1]) & 0x01 == 1:
print "reed switch open",
else:
print "reed switch closed",
if ord(status[-1]) & 0x02 == 0:
print "tamper switch open",
else:
print "tamper switch closed",
#This may be the missing link to this thing
print 'sending missing link',
zb.send('tx_explicit',
dest_addr_long = data['source_addr_long'],
dest_addr = data['source_addr'],
src_endpoint = data['dest_endpoint'],
dest_endpoint = data['source_endpoint'],
cluster = '\x00\xf0',
profile = '\xc2\x16',
data = '\x11\x39\xfd'
)
pass
else:
print " Don't know this device yet",
print ''
else:
print " Unknow cluster command"
print ''
pass
elif (clusterId == 0x00f2):
showClusterData(data['source_addr_long'],data['source_addr'],clusterId,data['rf_data'])
print 'Tamper Switch Changed State to',
status = data['rf_data']
if ord(status[3]) == 0x02:
print "Open",
else:
print "Closed",
print ''
pass
elif (clusterId == 0x00f3):
showClusterData(data['source_addr_long'],data['source_addr'],clusterId,data['rf_data'])
print ' Key Fob Button',
status = data['rf_data']
print ord(status[3]),
if status[2] == '\x01':
print 'Closed',
elif status[2] == '\x00':
print 'Open',
else:
print 'Unknown',
print 'Counter', unpack('<H',status[5:7])[0],
print ''
pass
elif (clusterId == 0xf6):
showClusterData(data['source_addr_long'],data['source_addr'],clusterId,data['rf_data'])
print ''
print "Identify Message"
#extract vendor strings
v = data['rf_data']
vendorstr = " - Vendor:"
start = 21
datalen=len(v)
while(start < datalen):
slen=ord(v[start])
vendorstr = vendorstr + "" + v[start+1:start+1+slen]
start = start+slen+1
print vendorstr
print "Sending init message"
zb.send('tx_explicit',
dest_addr_long = data['source_addr_long'],
dest_addr = data['source_addr'],
src_endpoint = '\x00',
dest_endpoint = '\x02',
cluster = '\x00\xf0',
profile = '\xc2\x16',
data = '\x19\x41\xfa\x00\x01'
)
elif (clusterId == 0x0500): # This is the security cluster
showClusterData(data['source_addr_long'],data['source_addr'],clusterId,data['rf_data'])
showData(data)
# When the switch first connects, it come up in a state that needs
# initialization, this command seems to take care of that.
# So, look at the value of the data and send the command.
if data['rf_data'][3:7] == '\x15\x00\x39\x10':
print "sending initialization"
zb.send('tx_explicit',
dest_addr_long = data['source_addr_long'],
dest_addr = data['source_addr'],
src_endpoint = data['dest_endpoint'],
dest_endpoint = data['source_endpoint'],
cluster = '\x05\x00',
profile = '\xc2\x16',
data = '\x11\x80\x00\x00\x05'
)
# The switch state is in byte [3] and is a bitfield
# bit 0 is the magnetic reed switch state
# bit 3 is the tamper switch state
switchState = ord(data['rf_data'][3])
if switchState & 0x04:
print 'Tamper Switch Closed',
else:
print 'Tamper Switch Open',
if switchState & 0x01:
print 'Reed Switch Opened',
else:
print 'Reed Switch Closed',
print ''
pass
else:
print ("Unimplemented Cluster ID", hex(clusterId))
print
else:
print ("Unimplemented Profile ID")
elif(data['id'] == 'route_record_indicator'):
print("Route Record Indicator")
else:
print("some other type of packet")
print(data)
except:
print "I didn't expect this error:", sys.exc_info()[0]
traceback.print_exc()

def stopXBee():
print("XBee stop handler")
zb.halt()
ser.close()

####################### Actually Starts Here ################################
#------------ XBee Stuff -------------------------
# this is the /dev/serial/by-id device for the USB card that holds the XBee
ZIGBEEPORT = "/dev/serial/by-id/usb-FTDI_FT232R_USB_UART_A901QL3F-if00-port0"
ZIGBEEBAUD_RATE = 57600
# Open serial port for use by the XBee
ser = serial.Serial(ZIGBEEPORT, ZIGBEEBAUD_RATE)
# The XBee addresses I'm dealing with
BROADCAST = '\x00\x00\x00\x00\x00\x00\xff\xff'
UNKNOWN = '\xff\xfe' # This is the 'I don't know' 16 bit address

# create a queue to put the messages into so they can
# be handled in turn without one interrupting the next.
messageQueue = Queue.Queue(0)

# Create XBee library API object, which spawns a new thread
zb = ZigBee(ser, callback=messageReceived)
print "started"
while True:
try:
if messageQueue.qsize() > 0:
#print "getting message"
message = messageQueue.get()
handleMessage(message)
messageQueue.task_done();
sys.stdout.flush() # if you're running non interactive, do this
except KeyboardInterrupt:
print "Keyboard interrupt"
zb.halt()
ser.close()
break
except:
print "Unexpected error:", sys.exc_info()[0]
traceback.print_exc()
break

print ("After the while")
# just in case
zb.halt()
ser.close()

Remember, for this to work properly, you'll need one of the Smart Switches in the network, but the Smart Switch that can measure power usage as well as control it was what got me into looking at these devices in the first place. Remember to look at the previous posts on this project as well, I may have forgotten to mention something.

The piece that is still missing is support for an accelerometer that is inside the key fob. I don't have a clue how to initialize and use it. I don't need it, it would just be nice to understand. Maybe after I get some of the other things I'm working on done I'll come back and take another look.

Have fun.

My Newest Old Toy

$
0
0
I've gotten some flack, not a lot, but there have been a few people that seem to think all I do is huddle over a laptop and play with tiny devices ignoring the world around me. Most of that is true, but there is another side I don't post much about.

After the flooding last year, and the possibility of the same when the rains come this year, I decided to dig some drainage ditches. My little Yannar landscape tractor can't do that in this soil. The dirt here has settled into a rock strewn landscape left over by glaciers and is almost impossible to dig in with a pick and shovel. I posted about this after a really annoying experience <link>, and I've had several more problems like that; I live on rock with a little sand thrown in.

Time for a bigger tractor because renting one at the pace I work (slowly) would be horribly expensive, and hiring a contractor has all the usual problems of getting someone to actually show up out here and do the job. There's about a hundred blog posts possible on that one subject alone.

Let me show off my cool new old toy:


This is the industrial model of the Ford 3550 tractor. These tractors were designed for daily use on large farms back in the '60s and '70s, so it's not a spring chicken, and has seen some use. However, it's supported by a huge collection of parts and books as well as a large number of people like me that have one to tinker with. This guy was made in April of 1974 by the afternoon shift; I decoded the date sticker under the hood.

This is one of the old-school tractors that doesn't use sheet metal, it uses 3/16 and 1/8 inch plate steel. Opening the hood is an interesting experience after playing with a small Japanese landscape tractor, the engine is massive.

Frankly, it scares me. Sitting 5 feet off the ground on a big machine is a thrill and the noise is exciting (remember, I ride a Harley too), but digging and moving hundreds of pounds of rock at a time is intimidating to the inexperienced. I guess I'll start by digging several holes and filling them back up to get some experience with it.

No, I'm not changing the direction of this blog, it's still about automating the house in a practical fashion with inexpensive technology that is fun to mess with, but I'm like a kid at Christmas with this big old thing and had to show it off. Besides, I may need to run wires underground or move a big device of some kind.

I think I'm going to love it.

Arduino, Raspberry Pi, Pool Controller and Another Guest Speaker

$
0
0
Let me introduce Mike He's another one of us folk that wanted automation, but didn't want to pay unreasonable prices or be locked into the control of some system 'out there.' He's been working on a project that I want to get into deeply at some point (when I get sorta caught up), and he's way ahead of me on it. Go ahead Mike:

The initial project...

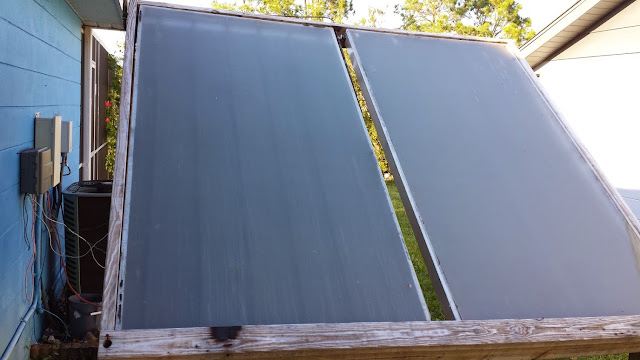
   Several years ago, I was trying to think of a way to extend my swimming season without breaking the bank. I have a heat pump on the pool but they aren't very cost effective to operate. As I live in Florida,  we have plenty of sun so solar was an obvious choice.  Problem is that I didn't want my roof covered with plastic pool panels as I intend to install PV electric panels there and since they tend to develop leaks, i didn't want salt water on the roof. I already heat my hot water with solar so I started looking into using the same concept for the pool.

   I located a pair of glazed DHW panels and set them up with a titanium heat exchanger so that I wasn't running corrosive salt water through the panels. Here's a picture of the panel...


   I used a circulation pump to pump the water in the closed solar loop and quickly discovered I could gain 5 to 6 degrees a day in pool temperature in March. I was losing 2 to 3 degrees at night but the idea was successful as I was still gaining heat. Since I didn't want to heat the pool past a certain point and I didn't want to have to manually control it, I needed a contoller. I was already  toying with my first Arduino (a Uno) so it was an obvious choice.

   I began to research temperature sensors and ran across the "Differduino" project. All I had to do was modify the hell out of it and I had my basic controller! I added an ethernet shield so that I could send data to an external site now known as Xively.

   The controller monitors the pool temperature and the panel temperature and turns the circulation pump on and off on a differential provided the pool temperature is below the setpoint. This part of the project has not changed, much....


The evolution begins...

   Then one day, I stumbled across the "Desert Home" page. Don't remember what I was looking for but this crazy fool was doing things I had thought about but hadn't figured out how to do practically. As he had put up all of his code and wanted people to see it and benefit from it, I decided to do so. Dave was (and still is) very helpful in getting things up and running and I soon had a Raspberry Pi to play with.

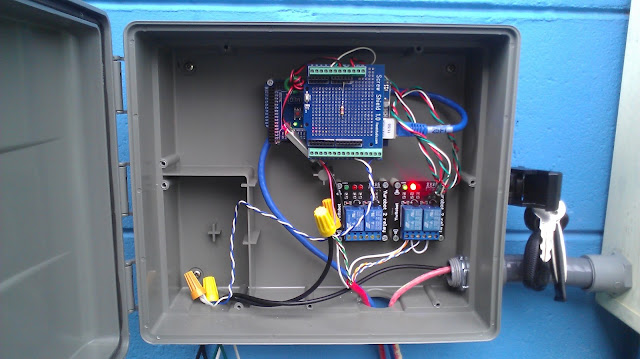
   The Ethernet interface on the pool controller was replaced with an XBEE radio and the data was being magically sent through the air to the RPI where it was being stored to do with as I chose. This led to a Web interface that can be seen at myeager.no-ip.biz that allowed me to see the data in real time. I added a temperature and humidity sensor so I knew what was going on outside. Here's a picture of the controller about this time..

The house controller...

   The heart of the project has actually shifted from the pool controller to the house controller. This creation started out as Dave's, 100%! As it was written in Python, it was a learning curve. My programming experience was mostly C++. As I came to figure out more of Dave's code, it became more natural to read and much easier to learn from. Once again, Dave would prod me along rather than hand me the answers. Kudos to Dave for that...

   As I was collecting more data from the pool controller and have built a few other devices as well, data was getting tedious to process. I ran across a library called ArduinoJSON and spent a weekend in the woods figuring out how it best suited my needs. I'd like to think I turned Dave on to that little treasure but he may have been exploring JSON already. If you haven't looked at JSON, I suggest doing so. I learned quickly that only so much will fit on an Uno...

Reboot!!!

   I got hold of a Mega 2560 and loaded the code to it. I had a ton of memory now (and 3 extra hardware serial ports). The SoftwareSerial library I was using could now go away but I didn't do that until I realized that it didn't work well with two way communication on the Mega. I added and GPS module I scavenged from Streets and Trips. Now I had Dave's house clock as well so I could set up timers for the pool. A Timezone library even correctly handled the time change twice a year. This has come in handy on a few other devices. I intend to add a pH probe to monitor the pool and an acid pump to keep the pH at a certain point but I haven't done it yet. I have added two way communication with the pool controller and several things are now adjustable from the Web interface.


   The pool controller and all other devices I've built so far operate entirely on their own and continue to do their thing even if the house controller is offline. I recently had to replace my pool pump motor and chose to get a Hayward variable speed unit instead. Best decision possible in my opinion. Much quieter and the energy efficiency is a big benefit.  Electric bill went down almost $60! I'm now using the timer that I programmed to run the pool pump to run the chlorine generator and the timers on the pump to vary the pump speed. I let it run at a low speed overnight instead of turning it off.

   The house controller also now incorporates ZWAVE and controls several lights and doors. It's function grows almost every time I look at it. The power of these inexpensive machines is impressive.

What's next?

   The pH monitor and acid pump are still on the list. I need to get my panels finished up, right now I'm operating on just one, and I need to get them permanently mounted. I'm working on replacing my DHW controller with one that integrates into this system and I've got an LED sign that displays weather data and pool information all over the XBEE network.  I'm also looking into adding an FPH system from Hotspot. I'll do my own controller rather than using theirs but between it and the solar, I should be able to swim almost year round. We don't get much of a winter....

This is Dave again. Nice job Mike, and thanks for chiming in. See people, you're not the only one that does this kind of thing.

Have fun.

Unexpected Electronics

$
0
0
I have a 2002 Jeep Wrangler that is  my everyday car. Living where I live I occasionally actually need the 4x4 and the winch I put on it has helped several people out of mud holes; nice vehicle. The other day my dash check engine light came on and when I glanced at the gauges, the oil pressure was maxed out. 

I've seen this before on other vehicles, and wasn't too worried; if it had gone the other way, I would have pulled off the road and checked it out. So, when I got to the WalMart down the road to pick up some stuff, I killed the engine and then turned the key on without starting it. Yep, I had 80 pounds of oil pressure without starting the engine. Needed a new sensor.

Stopped off at O'Reilly's and got one, then went home. I decided to put it in later when the engine was cold, I had other things I wanted to do besides burn myself on the exhaust pipe replacing a sensor.

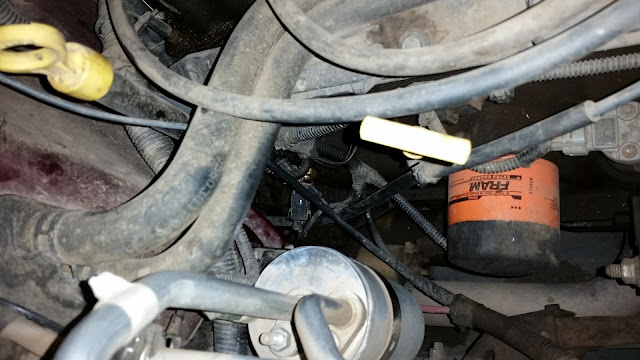
A couple of days later I went out with my morning coffee, a dog, and intentions of knocking this repair off in about thirty minutes. An hour later, I still hadn't managed to get the dog gone plug off the sensor.  Yes, I read the articles on the web, and looked a videos and such, but they didn't help a bit; the stupid plug was still on there. The sensor was near the passenger side firewall about a yard away and I could barely reach it cramming my arm down among all the wires and such with the release for the plug on the wrong side where I couldn't see it and get a screw driver in for leverage. Take a look:


Can't see it? Neither could I at first. It's that brass looking sliver thing in the middle of the picture way down inside. Click on the picture then enlarge and you'll see it. No, I couldn't get to it from the bottom; there was exhaust pipes and suspension in the way and I couldn't get my arm in there.

I was pretty disgusted by this time so I went Medieval on it. I grabbed a steel bar, a hammer and busted the plastic top off the sensor. Now, I pulled the wire up and disconnect the plug from the broken piece. I was on my way and had the job done in about fifteen minutes.

Moral, when all else fails, get the hammer.

This is all introduction to what I really wanted to show you; all folk like us have had problems like this where something is at the end of our reach and everything conspires to keep us from doing it. Just get a hammer.

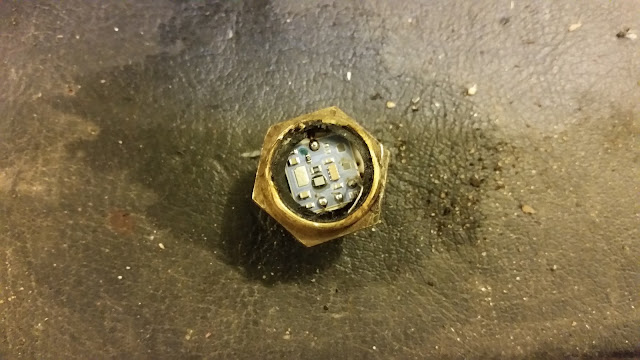
What I wanted to show you was the circuitry I found:


Yes, inside the sensor sealed in brass and plastic is a circuit board. I couldn't find any numbers inside to tell me about the circuitry, but it was reasonably sophisticated. No wonder the thing cost me $48; this is a cool device.

It made me wonder about some of the other sensors the car has. The throttle position sensor is a simple potentiometer; I've already taken one of them apart. I'm going to dismantle the others as they fail and get replaced, it may make this kind of job more fun.

Yes, I know that I have other things to do. I'm getting to the conversion to mqtt as I have the time, but converting the various devices to use JSON strings and such is a drudge since I've done that before, but I'll get to it ... promise. But I've got that new tractor and some holes to dig before the end of August when the real rains come.

Have fun.

Yes, I'm alive

$
0
0
I've been suffering from blog withdrawal, and folk have contacted to make sure I'm still alive. So, I thought I'd at least write a bit about what I've been doing recently.

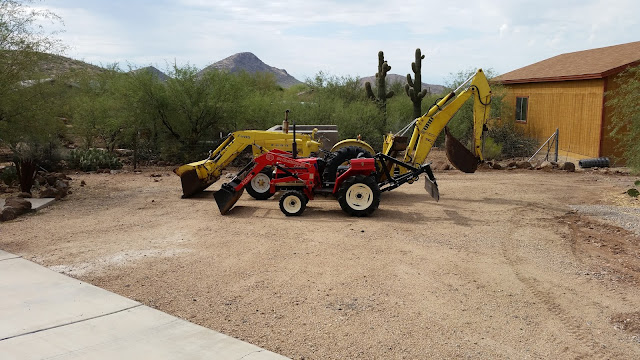
I've been doing things that aren't of a technical nature. I've dug some trenches and holes with the new (to me) tractor, and put a lot of money into my other tractor to get it running again. Here's a picture of my agricultural fleet:


I got the little tractor when I first moved out here and have been fixing things on it over time. It died recently because the fuel pump wore out. If you're familiar with diesel engines, you just cringed a bit. Diesel engine fuel pumps are expensive, and some of them are a real pain to replace because they set flow with shims and timing with various techniques. Fortunately, this is a three piston pump with each piston supplying an injector so there's no timing needed. I did have to set the flow with shims, but I guessed right the first time.

The pump cost me $535 and then I had to replace other stuff as well since messing with the old hoses and things broke stuff. All in all I have another $650 or so invested in it, but I need the little tractor to fit in places that the yellow monster can't get to. When I was all done, it started when the first cylinder hit the compression cycle; perfect.

Now the little tractor is off the to-do list, the trench is good enough to keep the flood waters from getting to the house, so I'm moving the big tractor into the garage for some work. Someone before me decided to fix the dashboard on it and got in over their head. None of the gauges work, and I want to know the oil pressure and temperature at an absolute minimum. I couldn't care less about the total hours, but it would be nice to know the battery is charging. I guess I get to learn all about monitoring tractor vital statistics next.

And yes, i can fit the tractor into the garage. I have an empty RV garage that I built with the house, but then couldn't actually afford to keep the RV on the road because fuel prices went totally out of sight. I sold the RV and use the space to set up tools for various projects. It's really nice to be able to set a table saw beside a band saw and move from one to the other as I build something.

A man can't ever have a big enough garage.

I really haven't done squat on the technical aspects of the house. Yes, I keep experimenting with MQTT to understand more about it and I'm very slowly converting the various devices to use the toolset, but progress is slow because I keep thinking about hydraulic pressures and depth of culvert openings to handle water flow.

I'm easily distracted.

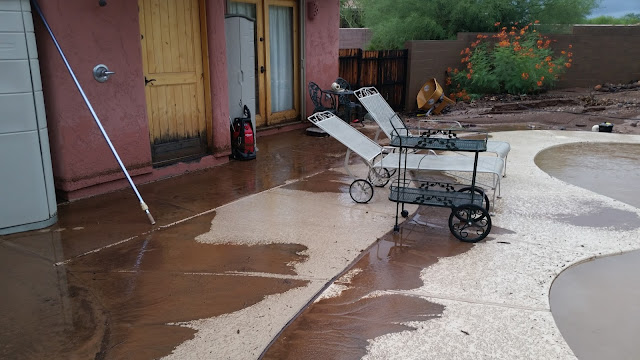
Speaking of culverts: The driveway to my place kept getting a deep rut dug into it by the monsoons here. See, we don't get much rain, but when it does rain, sometimes it comes down in a real torrent. We sometimes get three inches in twenty or so minutes and that causes flash flooding. I'm well away from the most dangerous areas for this, but as last year would attest, I'm not invulnerable to water coming down a hill and making a mess:


You should be able to see how high the water got on the house in the picture. When I realized I couldn't keep the water out of the house, I just opened the doors on the other side and let it out. That left me with about a half inch of water in the house and my wet vacuum was able to clean up the mess in a couple of days. I have tile floors, so all I had to do was mop up and everything was fine. It took about three weeks to clean out the pool though. I got seven wheel barrows of mud out of it before I was done.

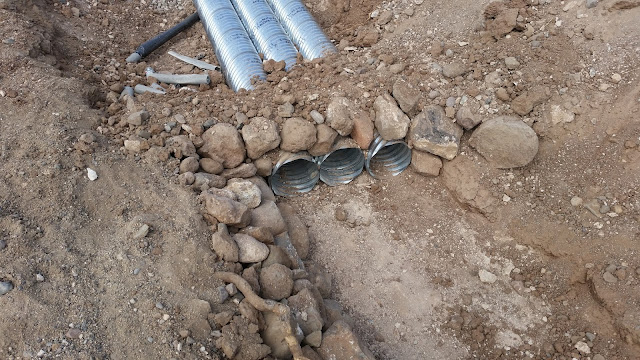
Anyway, back to the culvert. When I did some digging around the rut in the road, I found caliche near the surface. That limited the size of culvert pipe I could put in, so I used three 10" pipes instead of a single 18" pipe. Metal culverts need some sand in the bottom and then a covering with something that didn't have rocks and could be compacted. The sand I had in abundance, but I had to get 30 ton of aggregate to fill it back in. It turned out nice and the 16" rut is gone from the drive. The driveway services four houses, so I did a good deed for the neighbors as well.

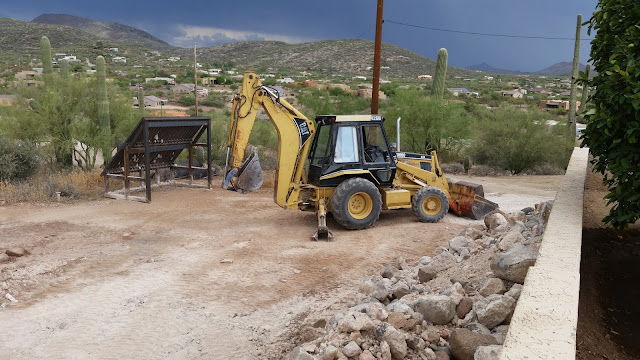
I want to admit to something though; I didn't use my yellow tractor to dig the culvert channel. The big yellow tractor was brand new to me and I didn't have a clue how to use it. I begged a neighbor for a favor and got him to bring his big ol' Cat backhoe over and help out.


Then another neighbor from down the road came up to watch and brought his skip loader with him. I had an entire crew of folk out there messing around with the road. I totally love my neighbors! It took all day because we dug up a telephone line (mine) and had to wait for them to show up to advise us. Yes, they were responsible for it because I called in advance and had the lines marked and they missed it. It really does pay to follow the rules when your digging with a machine; if I hadn't had it marked, they would have made me pay for fixing the line.

The before picture:


It's hard to tell from the picture, but the right hand side of the rut is over 16 inches deep. It made for an interesting drive for people with normal cars; they had to pull way over to the side and go very slow. The paint marks are where they marked the various lines for power and phone. They missed.


That gray thing in the hole is what's left of the conduit and MY phone line. It was a good eight feet from where they marked it should have been. The picture below is just before I was finally able to cover the pipe. It took them over a week to decide who was going to come out and fix it. I finally got them to do something when I told them it was just a matter of time before someone drove into the hole and decided to sue because of the damage to their vehicle. I think the idea of lawyers was enough for them to actually do something.

Just before I was finally able to cover it:


The folk among you that have done something like this are wondering what I did with the dirt and rock I dug out of the hole since I refilled it from other sources. I used that dirt to fill in the channels on my lot that were carved by the rain. I still need some more, but that will have to wait until I have some more money. With the new trench to divert the water, I don't mind buying some fill material to spruce thing up a bit and cover some of the rocks. Yes, I used my own tractor for this with a little help from the skip loader neighbor; I can work a front loader just fine, it was the backhoe that I needed to learn about.

Looks like a normal road now:


The rocks on the right are to keep people from driving into the intake hole, there will be more rocks moved in to define the road better when I get around to it. I didn't want someone trying to cut the corner driving into the hole there. Now, they'll slam into the rock and have only themselves to blame.

Folk in apartments in town wonder why people like me live out here and put up with this kind of thing. Frankly, from time to time I wonder myself. Me and Barkley, my dog, have killed three rattlesnakes so far this year; the desert toads have been going through their breeding season and the screams they make actually hurt your ears; there have been several weather alerts for sand storms; only one scorpion sting so far; and I had to clean the septic filter yesterday. But, sometimes you get something like this:


or


or


and think, "Maybe this isn't so bad after all."

Remember back in school when the teacher wanted an essay about "What I did last vacation?" Well this is mine.

Battery Operated Temperature Sensor: The Batteries Died

$
0
0
The previous entry on this project is here <link>.

I worked on this project earlier this year and put it into daily service back in April. The batteries died last night (this morning) at 4:00 AM, earlier than expected. They lasted 5.5 months and had the same rapid decline to 2.7 volts that I saw when I was running it in accelerated mode to understand how to do this.

Basically they coasted along dropping a little over time and then just dived, relatively speaking over a couple of weeks to a level where it wouldn't work anymore. This seems to be the normal behavior of alkaline batteries, so nothing new.

I am disappointed that it took less than six months to die though, but it died two days after my TV remote control died and I changed those batteries around the same time as this device. I remember because of the coincidence of having the remote need batteries around the same time as I started the long term test on the sensor. Could be the life of the cheap batteries I'm using.

The device was set for 115 seconds off and 5 seconds on and I can easily change that to a much longer off period if I need to, but I'm not sure I want to. Having the temperature available at two minute intervals is nice and fits with my longer term plans for temperature control in the house.

On the reliability front, this thing has worked day after day without a hiccup. I use it to turn off the bedroom and outside lights when I go to bed every day and sometimes just to show it off. Never gave me a problem unless the controller it talks to was having problems because I changed something there. It's still a bunch of components on a proto board though. I couldn't find an enclosure to fit it that I liked and decided to wait until I could buy a 3D printer to make something for it.

My tractor and the terraforming work around the house ate up the money I was setting aside for the printer and that has been postponed until I finish that stuff. Keeping flood water out of my house and repairing ruts in the driveway will always take precedence.

I put some more of the exact same batteries in it, and it's beside the bed again doing exactly what it's supposed to. I'll check on it from time to time and see what develops over the next six months or so.

Maybe by then I'll have an enclosure for it.

How Can I Possibly Be Annoyed at the Raspberry Pi

$
0
0
Yes, they're all over the place and my Google news feed keeps telling me about how wonderful they are, but I almost threw one across the room today. The story is that my weather station Pi lost its SD card; they do that sometimes due to the heavy usage the cards aren't designed for. I've had it happen before, and thought I was prepared this time. You guessed it, I wasn't.

Yes, I have backups of the system, and backups of the software; the problem is that I didn't expect the folk that control the Raspberry Pi software to close some doors on me. You see, after I decided to update and upgrade the OS on the Pi, it wouldn't boot. I like to stay reasonably up to date on my stuff, but often wait a while to get the latest OS and tool changes. With the other non-technical projects I've been working on, it's been a few months since I took the time to update the little machines. During this period Raspberry Pi went from Debian Wheezy to Jessie.

Besides the usual wondering who the heck thinks up these silly names, I thought now would be a good time to update my systems. That was my first mistake; my second was when I didn't read ALL about the changes in Jessie. You see, they decided to use 'systemd' as their default init process and I switched to upstart quite a while ago because it was better. There's a few hundred pages out there on what's best and why, but I don't really care about that; I just want something that works, and I can keep updated.

Fine, I'd switch to the default for the Debian Jessie, but you can't update over a Debian Wheezy that has upstart on it; that makes the machine unbootable. To add insult to injury, this all happened when I was trying to update Wheezy. They don't update Wheezy, they switched me over to Jessie and just left me hanging.

Literally. Yep, hanging on a console message with the machine unable to boot.

I know how to get out of this mess and catch my machines up to the latest, but I really hate having to do it. At least it was my weather station and not the control system for the house. So my plans are to update to Jessie, then load all the packages I use to run this stuff, and finally to update my startup scripts to use the init they want me to use. Probably about three or four days of fooling around for the weather station, then I get to do it all over again for the house controller.

I want to be up to date with the latest because, eventually, the Pi Zero will be back in stock and I really want to play with it. No, I won't worry about updating something that will become a control part inside something else; I'll just use it like some other chip. I'll have to be careful to isolate any code on one away from the OS and come up with ways of starting processes that don't involve the OS, essentially treating them like little black boxes. At $5, I won't much care if they fail and have to be replaced. Sort of takes some of the fun out of them though.

The very next iteration of my devices will NOT use the unix facilities to start and stop processes or to monitor what they do. I'm going back to basics and working out ways to handle it that don't rely on some programmers data politics.

Subject change. A few folk have expressed disappointment that I haven't been posting about my tractor rebuilding, dog door, trenching, culvert, and other projects for the last few months. When I told them that the projects weren't technical, they said, "So?" I didn't have an answer because I've written about rattlesnakes, dogs, shades on the patio, etc.

Sorry tech weenies, I'm going to go back to my old ways and talk about surviving in the desert with a bunch of technology included. It just may be hydraulics, water flow, pruning techniques and such as well as little tiny computers and hacking into strange devices. Heck, I may well post about the technical aspects of using snake shot to control the varmints that try to kill me, as well as my continuing war with woodpeckers.

But my Pi 3B is already on order.

I Wanna Talk About My Neighbor and a Big Hole in the Ground

$
0
0
As I've driven you nuts with in the past, this is Arizona USA, and it gets hot here. That pushes our electric bills through the roof for about half of the year. Some of us are taking measures to lower this expense and still maintain a good standard of living. Doing this isn't cheap in the short term, and most of us that pursue lower costs hope to live long enough to recoup some of our outlay.

It's not likely, but it gives us hope.

I have a neighbor that is going for it in a big way. He's working on geothermal cooling for his house. Sure he could have hired a company to come out and destroy his property and put in some half-baked system that he didn't understand, but instead he bought a backhoe and went to work. In this description (I have his permission) I'm not going to mention how close a neighbor or give any directions to his place. I'm also not going to name him, we'll call him George for this discussion. It's not his desire to have a bunch of people stopping by to look at his work or some government official taking credit for it.

So, George got the idea when he put in a well without a well bottom pump. Instead he used air pumped down the hole to percolate the water a few hundred feet up a pipe into a storage tank. For those of you that understand this, that means no moving parts at all in the well; nothing to break or have to be removed periodically for maintenance. Slick and it works like a charm. He had a little trouble intially with the ground level compressor, but it's all worked out now and runs every day. This was a big win and will pay for itself (the pump part, not the water well) in a short time.

First, he has a huge obstacle to overcome - the heat. The hole can't be six feet deep and cool anything because, like the cold country, the surface temperature reaches down that far. He decided to go deeper and wind the hose that will carry the cooled fluid into a big pit. He'll then pump the cooling fluid up to a heat exchanger of some kind transferring the cool to potable water that can be used to condition the air in some fashion. Current thinking is to just use a swamp cooler and circulate the water with the geothermally cooled water.

His backhoe is bigger than mine and he started the project by digging a small area a couple of feet deep. If you've been a reader of mine, you know what the soil is like here. It's basically rock held together by caliche with a shallow layer of extremely sandy organics for a surface. I did a post about a simple one cubic foot  hole I dug and what I got out of it that you can look at to illustrate the situation <link>.  This led to changes in his technique, modifications to the backhoe, and tons of debris (literally tons).


Here's his backhoe and the really cool rock screen he made to separate the rocks from the finer material (can't call it soil). For those millennials out there, the backhoe is the thing with wheels. To use the screen he dumps the material he dug out on the far side and the small stuff falls through leaving the rocks behind. Then he takes the rocks and piles them somewhere out of the way. The small stuff he'll use to refill the hole.


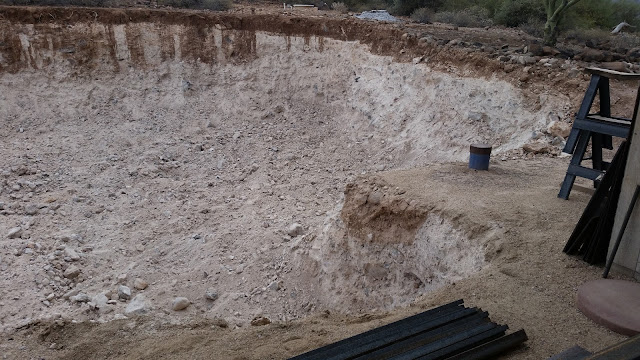
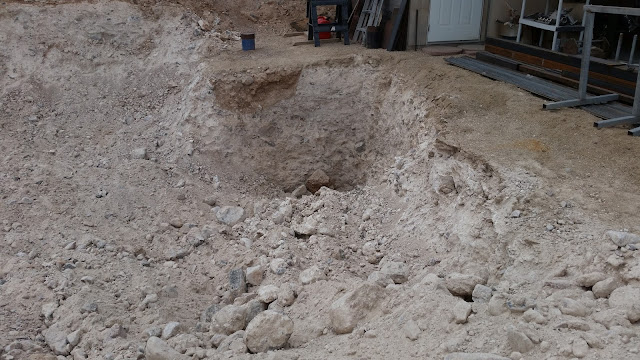
This is the beginnings of the hole. Notice what I was writing about the composition of the ground: a tiny layer of sandy organics and rock bound caliche the rest of the way down. Ever wonder why the desert doesn't have trees? Now you know.


There was a big granite rock over there that had to be dug around.


And, sometimes, bad things happen to the equipment. This took some time to fix, and wasn't the only time the machine broke down. From the beginning of the project to now, he has rebuilt most of the digging parts of the tractor. Only minor problems with the motor, hydraulic pump, and such, but everything that came in contact with the dirt had some time wasting problem or other.

But, let's look at the hole again. Here it is a little deeper.


And, here it is finished.


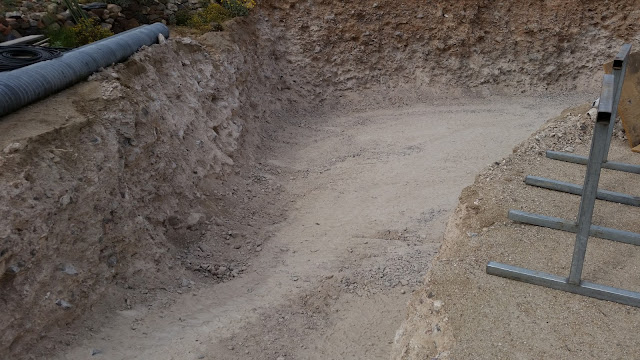
Notice that it has a ramp leading down into it? That's so he can actually get the backhoe down into the hole to dig, and then get the dirt out. Also notice how the dirt layer seems pretty deep on the far side; that's where the rain washes down and carries some mud with it. This project has been going on for months, so some weathering is expected. Here's a shot of the bottom on the hole, he back filled it a little to cover the rocks.


Eventually, he'll install coils of flexible pipe in the hole, protect them to some degree and then fill the hole back in. Pumping water down into the pipe will circulate it through the cooler material down there, and then he will transfer the cool into his house. This will work to warm a house also, but not much need for that here. Bet you're wondering where the rocks I talked about are.


There's several piles like these; here's another one.


No, not all energy saving projects taken on by individuals are small. Sometimes to have an effect, you have to think bigger than a tiny computer and some wall switches. The beauty of doing this kind of thing is that your skill set increases exponentially. It makes you understand the reality of what can be accomplished.

I'll be following this project over the next months, more later.

My Weather Station is Back Online

$
0
0
Yep, I got it working. About a week ago my weather station Raspberry Pi died, and predictably, I couldn't get it back up without major work <link>. It's all better now running on a Raspberry Pi model B. Yes, I know that isn't the latest of the Pi series, but I had it already, OK.

The Raspbian Jessie booted to a graphic user interface directly, not to a command line. This was a bit of a surprise because I usually bring up the Pi's I have headless so I don't have to hunt down enough equipment to bring them up on my TV. But, since I had the stuff handy from trying to get it working before I gave up and just reloaded, it came up and I configured it, then stopped the GUI. Loading the GUI makes the boot sequence much longer and I usually just use putty on a laptop to control these machines, I don't need it.

Contrary to many posts out there, the configuration screens worked just fine. I was able to assign a static IP address and finish the configuration easily. There was a little hunting through the various menus and icons to find things, but that's part and parcel of any first time installation.

But installing my stuff turned out to be somewhat harder than I expected because, as usual, every piece of supporting software had changed and I had to hunt down what I needed. I used the latest (as of the date on this post) version of libusb, it was 1.0.20, which was several versions later than the one that I would get from a normal apt-get on the Pi.

This version worked well and had a few 'gotchas's' in it that I had to stumble through to get it to work. There was enough documentation and forum postings out there that I found to help me through the process.

I also used the latest rtl-sdr. It was pretty easy as well, but also had a couple of things that I had to chase down. Then I loaded the version of rtl_433 that I had set aside so I wouldn't have to keep making my changes in that code. With the poking around I did in libusb and rtl-sdr, this piece was super simple.

I hooked them all together by starting things on the command line and it worked well. I was able to read the weatherhead RF signal and save it off to my database. The interface I have to move the data around for viewing worked just as it had before. The only thing left was to implement start up  and restart using systemd instead of upstart.

For those of you that wonder why I needed all this, let me describe what's going on a bit. The usb implementation on the Pi is kernal based and not easily modified by the user. That means I had to get libusb and install it. libusb is a user space interface to the usb capabilities on Linux. Then, I had to be able to read one of those sdr radios so I could find the RF signal from the AcuRite weatherhead. I posted about this earlier <link>. Now that I had the signal, decoding it requires rtl_433 which is a piece of software that was developed to decode the signals of many of the wireless devices available such as thermostats, temperature sensors, door bells, weatherheads, etc.

So, it's software piece piled on software piece piled on ... Sure, I could have incorporated all the things I needed into one piece of software and just ran it, but that's not what leveraging software is all about. You use the piece that does the job you need and add special tweaks specific to your implementation. That saves time and doesn't cost much if anything.

With it working and the only piece left being restarting the processes, I dived into systemd. First though, a tiny bit of background. Unix (and linux came from unix regardless of what people say) has to have something to get it going. This used to be the init process. Init would load the various pieces of software and handle how they interacted. Over time init was replaced with various other things that had more features or less bugs. As is rampant in unix and its derivatives, everyone hated something about each of them. Raspberry Pi uses an operating system called 'Raspbian' which is Debian modified to work specifically on the Pi. There are a ton of other operating systems and the choice of which one to actually use is totally up to the person that installs it. I chose to use Raspian because it was the one the folk that produced the Pi chose to supply. I figured it would have the most support and documentation of various forms over time.

The Raspian that I installed with my first Pi used Sys-V init. This system five init is really old and complex to use. I hate complex, so I replaced it with the clearly superior init process call 'upstart'. Upstart is cool and easy to use once you install it. However, the Debian folk decided that the init process 'systemd' was better and moved to it. Raspberry folk went with the trend and moved to it as well.

That was the decision point that caused me to have to rebuild the weather station Pi from scratch. Upstart wouldn't allow the Pi to boot up at all with the new Jessie level OS that you will get when you update your Pi. But, I did all that and now I faced the dreaded systemd configuration. I looked at about a hundred web sites that discussed how to use systemd to handle starting and restarting a process, and quite honestly, was about to give up because everything was too complex and peppered with 'try this' to give me enough confidence to dive in.

At this point I want to mention that following Linux questions on a forum is so predictable. Someone has a problem and asks for help with it. The first response is to ask for more information about how the system is set up, what they saw that wasn't mentioned in the question, and usually some test or other that can't be run because the problem won't let them. Then a response asking them what they are doing. Then a response that says they should be doing it another way because that way is so much better. Then several posts about how it should be done regardless of the original intent. Lastly, the thread ends with no resolution because the discussion has wandered off into never, never land.

I saw that over and over. I finally stumbled across a blog posting (love blog postings) that whittled all the crap down to something amazingly simple compared to what I had been clicking through for hours <link>. Neil cut all the crap out and just showed how to handle a simple case. I didn't have to dredge through long discussions of 'units' or 'forking' or relative merits of daemons; I could just take his example and use it. It worked first try for one of the processes and third try for the other.

Then I configured logrotate to handle the log files I use for debugging and I was done. Finally.

I still have to back up the SD card and store the image on my NAS, and I'll probably back up the other Pi's just to be somewhat safer (obviously you can't actually be 'safe'). I'll also update my github repo for the various things I changed along the way, but that won't assure me of no problems the next time, just make it somewhat easier to recover.

What will really make it easier the next time is what I learned this time.

Woodpeckers and Destruction

$
0
0
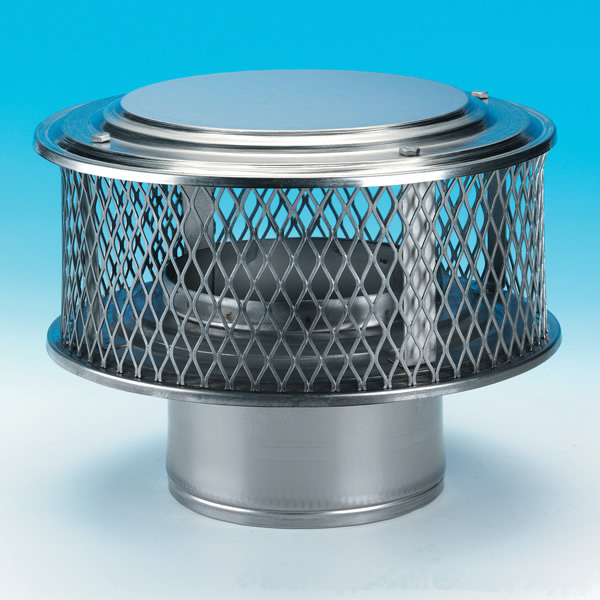
I don't really hate woodpeckers, but it gets real close. These winged engines of destruction are everywhere here, and constantly work to annoy and dismantle things. It's early spring here and the males are all out looking for girls. They do this by perching on my chimney caps (aluminum spark arrestors) and peck away in a particular rhythm.


Some woodpeckers sound like a machine gun, others peck 6-7 times then pause and repeat. Some do the three shot shuffle over and over. It appears that each chimney cap artist has his own riff and is very proud of it. All of them scared me at first, entertained me for a day or two, then just became annoying. Every morning begins with the staccato drum beat of some girl hunter seeking attention. I much prefer the neighbors rooster.

The noise of my chimney caps being pounded by a woodpecker carries a long way, and the jerk doing the pounding hopes it will attract a good looking gal woodpecker for amorous intent. If they do attract a female, then they get busy which leads to needing a place to nest. My winged pests are Gila (pronounced hee la) woodpeckers and often (too often) nest in holes in my precious Saguaro (pronounced saw wa ro) cactus. They actually drill holes in the side and move in; laying eggs and nurturing the next generation of annoying little flying cretins.


Sure, a BB gun and a little practice could lessen the impact, but not only were they here first, they are protected. Not sure why they are protected, there's about a hundred around here and more next door, but who's going to argue with a game and fish officer holding a ticket book? Someone told me they are classified as migratory and fall under some treaty or other that prohibits killing migratory non-game birds. Mine don't migrate any farther than the neighbors house; they're here all year. To be honest though, I have taken an air-soft gun and done a little target practice from time to time. Those things (air-soft guns) are horribly inaccurate at any distance and I never managed to hit one. It did teach the woodpeckers to fear me; when I walk outside, they're gone; off into the trees to screech at me to leave the area.

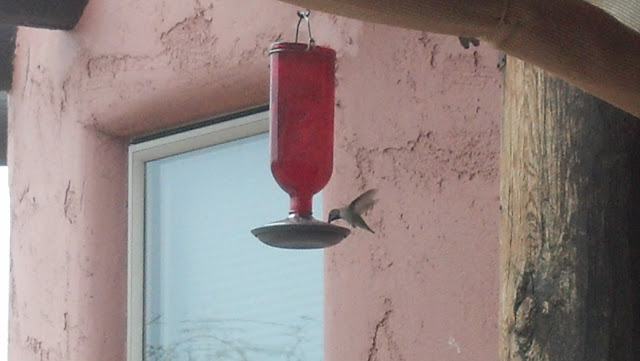
The little pests even hang off my hummingbird feeder and chase the hummingbirds away to keep the sugar water all to themselves. I had to stop putting bird seed out for the quail, dove and cactus wrens because it also attracted the woodpeckers. Once they got to hanging around the house, they decided to eat it.

I have vigas (pronounced vee gaa) sticking out of the house as decorations. They simulate the building techniques of the native builders of hundreds of years ago. The Spanish that came later adopted the same techniques and having logs sticking out of your house became something cool. The problem is that the woodpeckers began to drill holes in them. Once the holes penetrated the finish layer, the wood dried out and made the vigas sound hollow. When the woodpeckers hear a hollow spot, they assume there are bugs inside and drill away, which makes more spots dry out. Yep, a vicious cycle of destruction that leads to a viga that is full of cracks and holes eventually causing it to fall apart. I've repaired them several times over the years; once actually taking them down and filling all the cracks and holes with recommended wood repair materials and then putting them back up. I used really good elastomeric paint heavy caulking to keep the weather from eroding them.

Totally wasted effort, the woodpecker attacks destroyed them. Take a look at one of them:


Yes, all that damage was caused by the protected Gila woodpeckers around my place. Let me show you another one:


Notice there's no log end sticking out of the hole? That's because it finally dried up enough that the fasteners wouldn't hold it any more. It's on the ground broken and looking really sad.


Obviously, I'm losing my battle at protecting my vigas. I decided that wood just wasn't going to cut it; I needed some other solution. I considered forming sheet metal into a cylinder and putting that up, but I couldn't find a sheet metal shop that was cheap enough to do it, and the metal would look like ... well pipe sticking out of the house. Maybe I could cast them out of concrete and put that up. When I looked into that the mold became a nightmare of complexity. That kind of project should be left for something large and beautiful. Besides, concrete is really heavy. Then I went looking on the web for someone else that had this problem and it turned out there was a product that looked perfect.


This is a fake viga cast out of polyurethane foam. It looked like the perfect solution: Sun survival is relatively good, and excellent if there is a good paint protecting them. Light weight. Hollow so a mount can be put inside. They don't dry out. They look like wood if you are a few feet away. The only problem is they are a bit pricey and shipping is a factor because they are pretty big.

I ordered and received two of them to try out the idea. Of course, the first thing I did after unpacking was to flip one over to look at the insides.


The hollow interior is just perfect for making a mount. All I had to do was chop up a piece of pressure treated wood and mount it to the house, then slide the fake, er uh, faux viga over it and drive in a couple of screws.

After cutting out a bunch of debris from the hole, removing the sealing caulk from the edges I put my newly made mount in and shoved the faux viga into  the hole over the mount. A couple of weather proof screws later, it was mounted.


I still have to caulk around the edge and do some painting, but it worked. Based on experience, painted plastic lasts essentially forever in this desert, so the replacements should outlast me. If a woodpecker does poke a hole in it, I'll just fill it with silicon seal and paint over the spot. A simple once-a-year inspection should keep me from having this problem again. They won't mold, rot, attract termites; GREAT!

I still have the other one to install and then I'll order two more. My plan is to spread the cost over time replacing the worst of the originals with each order until I'm done and can stop worrying about woodpeckers destroying this part of my house.

Until the next battle with the vermin.

I Guess I'm not Really Annoyed at the Raspberry Pi

$
0
0
But, I just spent three days recovering another one. Almost exactly a month later than the last failure of one of my Pi's, the one serving as a house controller lost the SD card as well. Not terribly surprising, since I replaced the card at roughly the same time as the one that failed last month, but man it's annoying not being able to update the device without getting the latest OS (Jessie).

My whining last month (link) was because there was no way to do the update, upgrade cycle without Jessie being installed. This time I expected that, but I didn't expect them to have changed the way the USB handled USB serial devices. Took a few hours of poking around to figure that out, and of course, it was relatively simple to take care of.

In the interim, my Pi 3B came in and I got it running. That little thing is a whole lot faster than the preceding generations. It almost runs like a laptop. Boot up into the Xwindows system is pretty quick and it works exactly as expected. I didn't experiment with the blue tooth and wireless yet, but they seem to work just fine; the wifi connected to the house on the first try. I don't like wifi for controlling things around the house; the reliability just isn't good enough, but it's nice to have available. Blue tooth is a waste for my purposes, but it makes the boards sell better, so who am I to complain.

I didn't install it as my house controller because that would limit how I got to play with the new board, so my house is still running on a version 1B Pi. I hate the form factor of that board though, so I'll definitely be upgrading it to the Pi 3B to get the better form factor. Especially since I've already gone through the pain of upgrading my software to Jessie.

Lessons were learned. It was really inconvenient having to turn the darn lights off myself. My bedroom was dark when I went to bed; I actually had to turn on the overhead lights all by myself. I'd forgotten how to run the control panel on my pool and had to hunt down the manual for a couple of things. I couldn't check the garage doors from my phone and actually had to drive home once to be sure it was closed (it wasn't). Stupid water heater wanted to run during peak period.

The only thing that didn't drive me nuts was the house thermostats; they're mostly autonomous, so they took care of themselves.

Obviously, I depend too much on a single device. I guess I'll split functions to different devices and do things like have a default configuration for the water heater that always shuts down the electric element during peak periods. The pool will have a dedicated device that makes sure it doesn't run during peak periods. This will be easy since each piece has it's own code that has been made independent of what machine it runs on; I've just been complacent about setting up such a system.

Yes, it will mean more little machines that will have to be backed up somehow so that failures aren't hard to fix. There will also be problems with the stupid power supplies failing. Most of my power supplies have failed at least once; the manufacturers just don't understand that we need a good supply for these things at a reasonable cost.

Speaking of Pi power supplies. I just got a couple of these from Gizmo Junkies.
It's a real power supply that was actually designed to power one of these little computers. It actually supplies 5.3V and can slam out well over an amp of power without getting hot. I haven't pushed it to the limits to see what happens, but they do things like supply a REAL usb power cable so you don't get a huge voltage drop over the cable. I got mine on Amazon (prime shipping), but they're cheaper on the Gizmo Junkies site. I might just save up some money and get a few of these to scatter around the house. They only take up one plug on a power strip and you can change the cable and power Arduinos off of them as well.

Sorry about the randomness of this posting, but I'm still a bit frazzled from trying to remember all the packages I had installed on the Pi to make it work.

I think I'll rebuild a tractor hydraulic cylinder or fix the fuel system on my gas string weeder (again) to recover.

Sensing Temperature and Doing Something With It

$
0
0
A few weeks ago my defrost controller in my freezer died <link>. One of the two relays had just quit conducting current. These things are sealed, and I didn't want to just clean the contacts and have it fail, so I modified the code a tiny bit and switched to the other relay. About two weeks later, the other relay died. One relay lasted a couple of years and the other one a couple of weeks. Both relays would click, but it appeared the current just couldn't get through it. Sigh.

I ordered another two relay board with the same relay as a replacement. I seems almost all of the relay boards for the Arduino use exactly the same relay. When I looked at the specs more carefully, they are rated for 10 amps, but only a fraction of a horsepower. I'm pushing them at the limit by running the compressor through them. But, ... I can get replacement relays for about twenty cents if I buy 10 or more of them, so maybe I'll just put in a relay socket and rotate the relays on some schedule. I could also come up with my own shield board and use a nice big quarter horsepower relay in there. I'll look into that later, but I needed the freezer running properly; I installed the new board with the two relays paralleled to (hopefully) double the life by cutting way down on the surge current each relay had to handle.

A few days later I had visitors with small kids. The kids were fun and enjoyed the desert and especially the pool when the afternoon was around 115F. However, the frequent trips to the freezer to get ice and little hands managed to leave the freezer door open a little bit and the evaporator on the bottom froze up.

I drug out the heat gun and melted the ice and the freezer took off and started working again, but this was the second time in less than a month that the freezer had given me trouble. Clearly, I needed to monitor it somehow.

I thought about using various methods to look for ice build up on the evaporator, or sense the airflow that should be moving through it, but they were too complex for a simple job like this, so I decided to just monitor the temperature in the freezer and set off an alarm of some kind (email, text message, big red light, siren) when the temp reached some level. I already have a temperature monitor that runs on batteries <link>, but I didn't really want to put one of those inside the freezer. Mostly because I'm not sure it would work at temps below zero Fahrenheit, and the moisture would probably kill it anyway. Since I already had an Arduino in the top of the freezer running the defroster, why not just attach a temperature sensor to it and get the reading that way?

Also, since the Arduino has an XBee attached to transmit when the defroster is running, I could transmit the temperature to my house controller and actually log it to my database server up in the attic.

It took a couple of hours to come up with the first version of the Arduino code and another couple of hours to figure a way to get the temperature sensor inside the freezer. I wound up actually drilling a hole in the freezer and feeding the sesnsor down inside where it could catch the airflow inside. I just can't praise these little temperature sensors enough. I used one of the sealed DS 18B20 sensors that have a stainless steel can over them:

These have a wire long enough to run where I needed it and are as easy to read as the regular 18B20. Nice solution with no calibration required.

When I got the Arduino part running, I went to my house controller and added code to catch the XBee message which now contained the temperature as well as the status of the defroster and started saving the data to my database. Then, I modified my status web page to display the freezer and set up some code to grab the reading out of the database and display it for a 24 hour period.

While I was doing that I realized that I was already grabbing the power usage of the freezer using an Iris SmartSwitch so I couldn't resist saving that data as well <link>. Now I could display both the power usage and temperature on the same graph. Heck, now I can see the health of the freezer at a glance and (maybe) catch a problem before it melted all my frozen food making a nasty mess that would take hours to clean up, and cost a bunch of money.

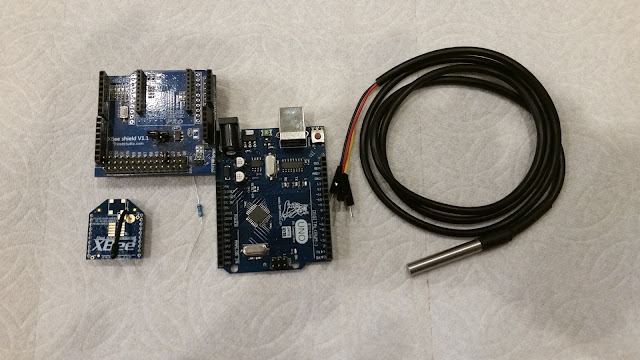
I was standing back, watching the blinking lights on the freezer and looked over at the fridge ... I really should do one of those for the fridge also, shouldn't I? I went back over to my box of parts and drug out enough pieces to build another device. This time I didn't need relays because I wouldn't actually be controlling anything, just monitoring stuff. I wound up with these pieces to build one of these:


The board in the upper left is an XBee shield that allows me to choose which port I hook the XBee serial lines to. I use the serial port for debugging and then use SoftwareSerial to enable a couple of digital pins to control the XBee. The XBee is lower left; the Arduino is center beside a 4.7K resistor. You HAVE to have the resistor for the sensor, far right, to work. Since I managed to grab a handfull of Arduinos for three bucks each some months ago, the whole collection, including the XBee cost less than $25. I powered the entire mess with a wall wart that I picked up for a buck or so and used one of my many USB cables for the power cord. Straight forward and simple project.

I also modified the code for the Arduino such that the name of the device is taken from the XBee and used in the message I send. That way, when I build one of these for the freezer I have out in the garage, there are no code changes needed at all, I just name the XBee to match the device I hook it to.

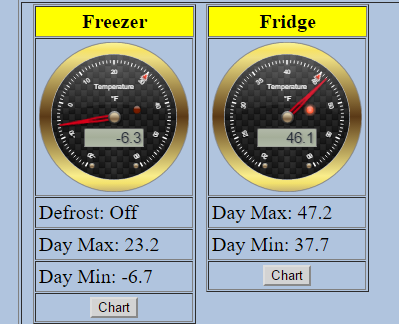
Then, I made the same kind of changes to my controller code and database as the freezer and I can monitor the fridge exactly the same way. I took the easy way out on the web display and just added a couple of tables to the html to display the current temp and a button so I could get to the graphs for each of them:


Since getting the highest and lowest values for a 24 hour period is a database query, I can display them. I added the status of the defroster to the freezer because it can get warm for a few minutes in there when it's running, and I didn't want to get excited when I saw a higher reading if that was what was causing it.

The indicator on the fridge is on because I haven't decided what to set the indicator to yet. I want a few days of data before I start setting up alarms to tell me something is wrong. I'll probably wind up setting it to 50F or so though.

When you click on the 'Chart' button for the freezer you get:


The wide jumps in power are the compressor turning on and off; the narrow spikes are the ice maker doing its thing; and the jumps that go off the chart are the defrost cycles running. I need to do a little tweaking on the chart to keep that from going off the top. Notice how the temperature rises slowly and then crashes down when the compressor turns on? There's a little interaction between the temperature changes and the frozen items in the freezer that causes some 'ballast' effects. It's all good and everything is fine.

Similarly, the fridge graph looks like this:


This looks cleaner because there's no ice maker or defrost cycle to clutter things up.

It's nice being able to actually see how the appliances are working and what level of power is actually being used. I still have to decide what values I'll set up for alarms for the devices and implement them in some fashion. I'll probably just send myself email telling me to take a look, because it takes a few hours for something bad to happen when the fridge or freezer acts up. The big thing is that now I can.

While I was doing this I noticed how easy it is to save my own data locally and then do something with it. For years now I've been using cloud providers like Xively, GroveStreams, etc. for this. I'm going to totally reverse that decision. As I've said a number of times, I hate depending on some provider out there somewhere to save my data for me. When the internet goes down, my data just drops on the floor and disappears; saving it locally for a year or so is not that bad and I have complete control over it. I won't have to rely on the provider not changing the interface, changing the storage price, changing the manner they deal with me, etc. Home automation and monitoring is a multi-year endeavor and internet companies work on a month by month basis. Not a good combination.

Don't get me wrong, I love the IOT (Internet Of Things) idea, but to me, it means being able to get to MY things over the internet without having to rely on someone else's company policy.

All the code for this is in github if you want to grab something.

Unexpected Pest Control Problems.

$
0
0
If you've read a few of my posts, you know I have a few problems with critters out here. I love sitting on the patio watching the quail sneak around the yard trying not to attract the attention of my dog. The rabbits get in the fine sand and roll around playing leapfrog... Really, they actually play leapfrog. They take turns jumping over one another and roll around the the sand kicking it as far as they can. The lizards watch while doing the push-up thing they do.

And then it all comes to an end when a Harris Hawk flies over looking for breakfast. All the critters head for cover, and it can be thirty minutes before they venture out again for play.

There are only a few destructive animals that I don't get along with. Woodpeckers I've already complained about on this blog <link>, but now I want to talk about rats, mice and small ground squirrels. These rodents build nests inside the engine compartment of my SUV and proceed to eat the wiring. They eat the swimming pool wiring, steal anything shiny, and believe it or not, move the dog poop around.

Gross right? They move into a new home behind an outside cabinet and then get some cactus and dog poop to protect the entrance. The reason for the cactus is obvious, simple protection. They move the poop into the entrance to disguise the smell. Hoping that no other animal will realize there's a rats nest in there. Of course the snakes are wise to this and go behind every cabinet. Makes for some interesting times.

Up until the last month I've had this under control. I use Terminix for pest control because I don't want to have to worry about storing poisons, and for 10 years now they kept the rodents under control with poison. Yes, poison. They have a carefully designed enclosure that only lets the small animals in and the poison is inside a chamber at the back of it. The poison is in large pellets with a hole in the middle, and then it is threaded on a wire so it can't be removed. It's a clever design that contains the poison while allowing access to small destructive pests. The nice thing about the poisons is that, after they eat it, they go into a hole and die; they don't lie around the yard.

Yes, there are concerns about 'secondary poisoning,' but that doesn't happen very often. In fact everyone out here uses poison and no one has ever had it happen. Secondary poisoning is where the rat eats the poison and then the pet dog eats the rat and gets poisoned. I haven't heard of it happening, so I called my vet. He hadn't ever had a case of this, but it was a possibility. He said an average dog would have to eat a pile of rats to get enough to cause a problem.  Basic chemistry, 40 pound dog, 10 ounce rat; big difference.

Caveat though! The rat poison Bromethalin is dangerous. The problem with it is that there is no test for its presence and no treatment for exposure. This nasty stuff is a neurotoxin and just flat dangerous. I never let this stuff anywhere near my place. The old fashion anti-coagulants are fine since there are treatments and tests that the vet can do.

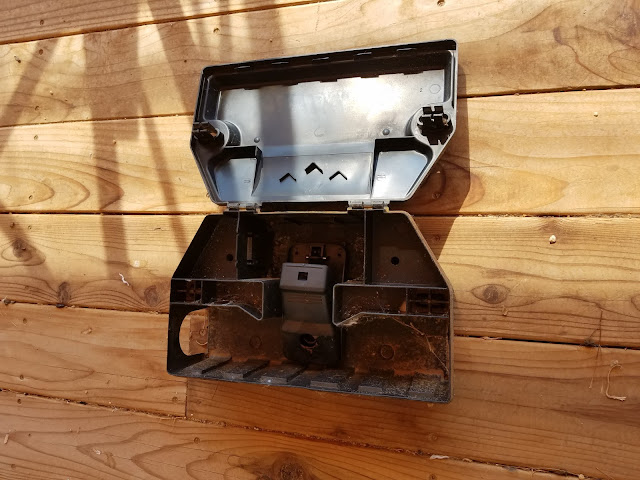
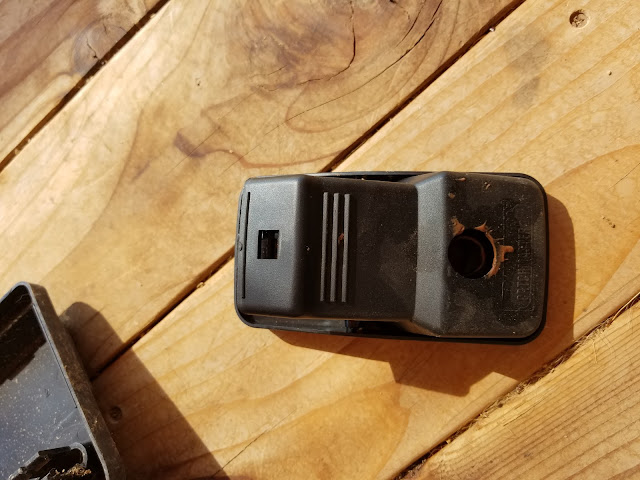
Here's one type of enclosure they put out:


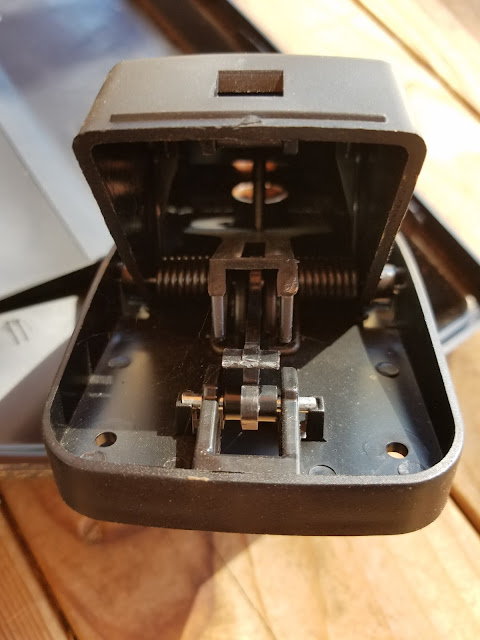
Notice the hole on the side? There's one just like it on the other side as well. I put these up against the house, barn, swimming pool fence, etc and the rodents run through it going from place to place. They eat the bait, and my problem is solved for that particular rodent. Here's an inside view:


This one has the trap inside instead of the bait.

Anyway, this method has worked well for me for years now. NO MORE. Terminix decided that they aren't going to use poison anymore and put out traps. I objected, but decided to give it a try.

Serious mistake.

What happens is that the rat goes into the enclosure to get the bait, the trap springs and kills the rat. Now in about an hour the rat swells up and starts to stink. Remember, the trap is inside a black enclosure and the heat accelerates decomposition quite a bit. The stink attracts the ravens which crowd around the enclosure trying to get to the dead rat for lunch. Of course my dog absolutely has to chase the giant crows away barking his head off the entire time. He gets tired and leaves then back come the ravens. This gets the attention of a wandering coyote who sees a chance to grab a big crow and it starts looking for a way into the yard. The dog notices the coyote and goes out to protect his yard and gets snapped at by the coyote. I've already lost one pet to coyotes so I have to go out and scare the coyote away. Usually I just scream at it and it takes off, but the last week they've gotten bolder so I shoot a .22 into the ground to get it to leave.

Don't think for minute that, if I got a clear shot, I wouldn't kill the coyote. I hate those animals. But I don't get a safe line on the coyotes with my dog and a bunch of ravens milling around. Yes, it sometimes results in a call from the neighbors, but they've gotten used to me over the years.

I finally get all the different animals dealt with and have to attend to the dead rat. I open the enclosure and take the rat out, get the water hose and rinse out the blood and maggots, rebait and reset the trap. The rat goes in the bin inside a plastic bag to contain the smell. The ants and such take care of the debris that I rinse out of the trap. It's quite a messy procedure and takes about thirty minutes or so not counting the shower afterwards.

Last week a turkey vulture was circling my house. I had been lazy and left a rat in the trap over night. The stupid vulture stayed around all day driving the rabbits and quail under the bushes and any place else they could hide. It went away finally and things returned to normal. All in all, the trap experiment was a bust. It's just too much aggravation and time.

Just how many rodents do I have around here? This is from a poultry site <link> and can be used as a really rough guide to the level of the problem:

The presence of rats and mice is not always obvious. However, one rule of thumb for the estimation of rat populations is as follows:
  1. Rat sign but no rats seen – 1 to 100.
  2. Occasional rat sightings at night – 100 to 500.
  3. Seen every night and occasionally by day – 500 to 1000.
  4. Many by night and day – up to 5000.
The frequency of catching rodents in traps may also be used to assess the level of infestation.
According to this I have between 500 - 1000 rats to deal with.

I called Terminix and they said they would have the local service manager contact me. About an hour later he did, but there was no satisfaction there. I'm extremely polite when I do this kind of thing. I try to 'nice' my way into getting what I want because yelling and anger just doesn't work. However, the service manager works by different rules.

"I will never allow poison to be used on your property." is a direct quote. Another one is, "Are you licensed to spray pesticide?"

My answer was simple, "No, that's what I hire you for." I didn't see any relationship between being licensed for commercial application of insecticide and rats, but when people get excited they tend to wander.

I thanked him for his time and told him I was going to call his corporate headquarters to hear directly that this is their new policy. I wished him a good day before hanging up. See how I do this; 'nice' them to death.

About six minutes later, when I got hold of a rep in corporate, they already had an email telling all about the conversation from his point of view. It didn't match mine, but this isn't a court of law, it's just a customer complaint. The rep at corporate told me that it was truly their policy to not use rodenticide any more, and they had moved to kill traps instead. I pointed out that I had essentially an infinite supply of rodents and that just wasn't going to work out. Their solution to my problems disposing of the rodents was to simply call the technician out and have him take care of it.

Think about that a minute. I have a dead rat in a trap and call them. They schedule an appointment for two days from now and I have to put up with all the above for two days before he comes out. It wouldn't be too long before the tech would be too 'busy' to get to me, and I'd have to wait longer, or take care of it myself like I've done for the last month. Keep in mind that there are literally hundreds of rodents. Not acceptable.

Also, an unexpected problem came up. The rats figured out how to break the trap. They simply go around the back and chew away the trip mechanism which releases the trap and they get the bait. I was actually surprised at this; the average rat intelligence must be going up in this area. Here's the trap:


And here's shot of the back of it:


Look closely, there's teeth marks on the trip mechanism where the rat disabled the trap. This trap is fodder for the garbage can unless I want to use it as a clip somewhere.

Currently, there is no solution. I'm waiting for a call from their regional manager to discuss it. We all know what will happen. I'll simply not pay the bill and let the service lapse while finding some other company to take care of spraying for insects. I think I'll just use their bait enclosures and buy my own poisons. That way I can use what I want and not adhere to guidelines that some company has put in place.

It's a shame though. I've used the same company in two states and different houses over almost thirty years and some manager somewhere institutes a policy to avoid a problem I simply don't have and haven't seen. Thus, creating a whole bunch of problems for customers like me. Typical short sighted management that doesn't allow for enough situations.

Bet I wind up saving money though.

Simple Temperature and Humidity Sensor

$
0
0
Anyone that plays with little computers has seen articles about the DHT11 or DHT22 sensors. They're clever little humidity and temperature sensors that don't require calibration and measure the two factors we all complain about when discussing the weather: temperature and humidity.

I've seen them, but actually never worked with one because, here in the desert, the humidity seldom gets out of the 20's. I've messed with a number of temperature sensors, but humidity didn't interest me much. That changed when my daughter and her husband bought a new house.

It's (the house) one of the new energy efficient homes that is really well sealed up and even has solar panels. The energy efficiency actually works, they use a lot less energy than I do per square foot and the place is comfortable in all kinds of weather. The big drawback is getting smells and moisture OUT of the house.

Suppose you're cooking dinner and have a couple of pots boiling on the stove, and the teenager takes one of those 20 minute showers they're famous for. The water build up in the house is huge. If the temperature outside is hovering around 20F, you can't really just open some doors and windows to air it out, so the water builds up until it becomes pretty uncomfortable. The steel front door starts to condense water and it runs down into a small puddle on the floor. The glass on the skylite (double paned, but covered with snow) starts to condense water and it drips on you when you stand under it. The solution is simple, air the place out and get rid of the moisture.

No, the fan over the stove doesn't help much. She turns it on, but naturally the steam misses most of the hood and goes for the ceiling. Those fans and hoods over the stove aren't very useful. They need to be bigger and have an actual FAN in them, not one of those six inch noise makers. If I have to listen to a fan, it really should actually be doing something.

I suggested they measure the humidity and see what is going on, so they can decide which of several methods they need to try to remove the water floating around, but my daughter had another idea, "Dad, why don't you make me one?"

OK, I can do that:


I got to try out the I2C input serial LCD displays and the sensor. It was a fun little project that took about three hours rounding up all the right libraries to make the devices talk. It took me a heck of a lot more time ordering and receiving the pieces. Of course, I already had the Arduino, cable, and sensor, but the display and sensor came from way far away.

It just works; no messing around with calibration or strange problems.

It's raining a bit today

Yes, I know you can buy these things for a few buck off Amazon or whatever, but where's the fun in that? Also, I managed to make a deal where I build it, and they figure out an enclosure that suits their taste. That was totally evil of me. The hardest part of this kind of project is enclosing it inside something and making it look nice, and I totally passed the buck on that part.

Total win for me. Plus, the kids can say, "Grandpa built that."


A New Web Interface for Desert-Home

$
0
0
Remotely monitoring and controlling my house has been part of the technical work on the house ever since I started. Like every other homeowner in the world I wonder if I closed the garage door ten miles away from the house. Monitoring the power usage and closing the garage doors was my main motivation for getting into this.

I came up with a web page that let me control things and see what was going on a few years ago, and have never been totally satisfied with it <link>. It worked and told me what I wanted, but it looks too small on a phone and is kinda clunky.

Here it is on my phone:


Later, I discovered the MIT Android App Inventor and created an app using it. This tool was (almost) exactly what I needed to get a native Android app on my phone<link>. The problem with it came up when the app got big. The way they work it is with a single work space that you place graphic elements into creating an application. When it gets big, you can't see enough of it to move things around and connect the dots. While I used that app, I looked around for other solutions.

This actually led me to create a native Android application that could talk to the house. The Android app was pretty cool:


Normally, the 'Wait' would be replaced with the current temp, and the various gauges would be showing data, but things changed (as usual) and I didn't update it. Obviously, I was really into green and brown at the time, plus I still liked the brass gauges. This app was fun because each of the device panels would slide in from the side and slide back off when I wanted to get rid of them. That left the display of only the items I was interested in at that moment. People were properly impressed; I was proud.

The problem is that Android is a pain to program to. The development environment is HUGE and takes a significant hunk of the storage on my laptop. Testing it means putting it on my phone, testing a bit, fixing it, putting it back on the phone, over and over again. The methods work, but they get really monotonous. There's an emulator in the SDK, but I couldn't get it to work reliably or fast enough to actually do things. Plus, at that time, the emulator couldn't talk over the network which means large portions of the code couldn't work there.

I'm not knocking the Android SDK, they did a fantastic job of putting it together and working out a way to develop apps, but it's a huge mess for an individual trying to do a simple job like this. I was taking on the jobs of a team of developers instead of just coming up with something to control my house.

I went looking again. Since I had come up with three methods already, I knew more about what I wanted to have:

A web interface of some kind that would work nicely on the phone as well as my laptop. I was perfectly willing to accept some compromises because of the difference in screen dimensions and mouse vs. finger input methods, but I wanted it to be mostly seamless between the two.

One set of code for both of them. It is too cumbersome for an individual bringing up a control system to keep track of code for different viewing devices. I could never remember to make corresponding changes to each piece, and one of them, or the other, always fell behind.

I want to be able to put a tablet on the wall, walk up to it, change something around the house and not think about what device I'm using to make the change. So, a phone, a tablet or two, the laptop, my friends computer, etc. Kind of daunting when you think about it; that's why it's been years of messing around.

But, I recently bought a Samsung Galaxy Note 7. Yes, the one that is exploding and catching fire and isn't allowed to be turned on when you're flying. That one. I love it. Sure it's big, but that means I can actually see things on it, and the fast charging is absolutely great. I can charge it from totally dead to full in less than two hours. No wonder they tend to blow up. Anyway, the new phone prompted me to take another look at something to control the house with.

Prowling around the web, I found several interfaces that looked promising, but they all had those esoteric marketing descriptions that have a lot of words, but very little to tell you how to actually use it. Some really good authoring systems that could fit the bill, but there were flexibility concerns with them. While I was looking, I kept thinking about how things that some corporation supplies change whenever they change a manager, so I decided to use some JavaScript library that I could, if needed, copy to my own machine in total and avoid the dependency on them keeping their stuff online and active. I do this with Arduino libraries, why not be prepared to do it with other stuff as well?

Enter JQuery Mobile. It's a couple of libraries that sit on top of the JQuery we all know and love (hate), and has been around for a few years. It's not maintained very much anymore since the lead developer has moved on, but it does what I want and handles all the crap of resizing various things when it displays on a different size screen. It even supports 'themes'; that's when you want to change the look of the presentation with different colors and such. They put in animation for popups and sliders, so I don't have to learn about that, I can just use them.

Sure, it may not keep up with the latest trends since it hasn't had a substantive change in quite a while, but that only means I don't have to keep changing things because it did. No, it doesn't support older browsers, but I don't use them; I keep my browser up to date. I can also copy the libraries to my Pi and keep what I have for a very long time.

It took me a couple of weeks to put the code together, and it looks like a whole lot of stuff already out there on the web, but it works with the way I do things. I still have my cool gauges to show various readings, and the charts that I use to tell me when something is starting to have problems. I managed to leverage a whole lot of the code I used for the original web interface to save me time learning how to do that all over again. So, I have my gauges, charts and control buttons. I even messed around a bit with a custom display that looks pretty cool for the thermostats. Let me take you on a quick tour; first a picture of what the main screen looks like on a laptop:


Boring right? I only show two gauges on the initial screen because that's really all I'm interested in most of the time. The temperature and the power usage right this minute. The other items are buttons to separate pages in the application that I can go to for more information. Looking at the thermostats:


Yes, they have color and are too far apart on the screen. The resolution of the laptop does this. I could easily expand them to be larger, but this works for now and adjusts fine on the phone or tablet. This is what it looks like on the phone in portrait:


This is the way it would look on a tablet mounted to the wall where I walk all the time. Tells me what I want to know in a glance. Similarly, in landscape:


I personally think this looks nice as a two thermostat control panel. Tells me everything I want to know at a glance and a little interaction can make changes. More about the way to change things in a moment, first, look at the presentation of the first page in landscape:


The two gauges are clear and easy to read. Notice I finally got tired of the brass gauges and went to pastels and chrome. I'll get tired of this too, but for now it suits me. In portrait:


The two gauges are still clear, but now they're vertical; I got this display for free with the JQuery Mobile library. I can scroll down the screen to see the other options by just brushing the screen:


In case you're wondering, the footer is a marque that slides from the left across the screen; that's why it looks different on each picture. Now, back to the thermostats and how to change them. When I tap on the little gear on the bottom right of the thermostat it slides in a popup that holds the controls:


Here I can change whatever I need to and then tap the 'Set' button to send the changes off to the thermostat. Slick huh? Yes, the house runs warm during the day; I live in the desert remember? Also, I don't like high electricity bills.

Yes, I have the charts on there. For example, the house power and outside temperature are displayed by the 'House Chart' button:


This is landscape mode, the portrait mode looks too crowded since all the data is compressed to fit on the screen. This is touch zoomable, and I can zoom in on any part of it. This comes free with HighCharts, the charting tool I've used for the last couple of years.

I do the same thing for the fridge, freezer and freezer in the garage:


That's the house freezer with its stats for the last 24 hours, and when I tap on it:


The chart for its activity during the last 24 hours slides in and displays. I even enabled the points on the chart for examination. I can keep really good tabs on the appliances I've implemented so far. I really want to include other things over time in a similar fashion.

The pool looks like this:


This tells me the pool motor is running on high, the waterfall is on, the light is on and the fountain is on as well. Yes, I turned them all on for this screenshot. The motor is black, green, red for off, low, high. I tried to animate it, but is looked silly. Each item is a button that can control that accessory, for example:


Tapping on the 'Off' button will actually turn the fountain off. There are other things I want to add like the temperature of the water and actual speed of the motor, but I haven't gotten to them yet. 

No, I didn't forget the weather station:


Each of the parameters I measure has its own gauge and shows the last reading I took. In portrait mode they are a series of gauges arranged vertically. When I have enough data to chart it accumulated, I'll add graphs for them. I'm not sure what's the right way to do that yet. Do I need 24 hours or the last week? I'll get to that someday.

The Statistics button on the bottom shows this:


I'm going to add stuff like rainfall this year, last rainfall, highest historic wind speed; you know, the stuff that impresses people that don't realize how easy a database query is to code. (Don't look at the low temp above, that's not a bug, it's a feature)

The last thing I'll bother you with is the control page for the lights. I currently only control four of them here. Here's the display as it normally appears:


All the lights are off. I do this control differently, each light is a button that can be toggled, so tapping the patio light will turn it on. So if I tap a couple of them the page will look like this:


Kind of adds a little color to the display. These are controlled by wemo light switches that I described breaking into through several posts.

Like I've said annoyingly, this is one source for all devices that I may want to use to talk to it. I kind of hated giving up on the other attempts, especially the Android native code, but it's already out of date and several versions behind in the Android system it runs on. It's unlikely the web will change that fast and the latest thrust is to use web applications anyway.

Those of you clever enough to figure out the URL are welcome to take a look, but remember, be kind; it's running on a little Raspberry Pi. You can't actually control anything unless you figure out the super-secret high security password, and if you do, I'll just change it.

Now it's time to see about exchanging that phone ...

OK, Now About UPS's and the Raspberry Pi

$
0
0
I have had a UPS for my NAS for a while now, but this season's storms caused me to seriously think about getting another one for my set of Raspberry Pi's. Every time the wind got over 20 mph, the power would go out, thunderstorms would kill the power, and the occasional dust devil in the right place would cause those short power failures that just mess things up. A couple of the power failures were those messy ones where the power dropped to almost nothing, then came back, went away again, and finally just died for a couple of hours.

I wasn't concerned about spikes; I have a bunch of protectors around for that, but it gets annoying fixing the various software problems power failures make on the Pi. So, I got a second UPS to install where I have my Pi collection. I bought another APC BE550G:


This is big enough to handle the short outages, and has enough guts to run the various things I may hook up. I chose this one because it's the same as the one on my NAS that runs it and several other little computers up in the attic. Why have two different devices?

Yes, it's an expensive solution, but after I buy a power supply board and the circuitry necessary for battery backup on the Pi, I would have spent just as much and still need more for the other little computers. I already know how to make one of these, so it would be just grunt work and not much fun.

The NAS up in the attic has really cool power fail software, so I went looking for something similar to run on the Pi and found a tool called apcusbd. This is a daemon that runs all the time monitoring the USP port on the UPS. When it finds a problem it can send email letting me know as well as messages to anyone logged into the machine. It will also send a power down to the UPS shutting off the power when a timer runs out.

This power down is important. When you halt a Pi, it just halts, there's no power down, and that means you have to unplug, plug to get it to come back online. So, for unattended operation, you have to somehow cycle the power to get the Pi back to working. I have to halt it because, if I don't, it will screw up the file system, or even worse, corrupt the SD card so I have to get it from backup. Been there, done that, too many times.

If I could get this all working correctly, it would go a long ways to solving some of my SD card problems over long periods of time. I dug in and installed, configured, and tested apcusbd. It worked really well on the first try after I configured it. There are literally thousands of sites out there that tell you how to install and configure this software, so I won't repeat it here, but there was one problem: it wouldn't turn the power off on the UPS.

Digging into the configuration did nothing for me; it looked like I got it right, so I started testing pieces of it. Apcupsd allows the use of scripts that I could modify a bit and test the power down functions. When I tried them, they worked and actually turned the power off. This left me confused; if they worked, why didn't the power turn off? I looked through the syslog and found nothing to help in troubleshooting this problem, so I dug into the shutdown procedure of the Pi running under Jessie. Man, what a complex mess that is.

See, systemctl sets run level zero which causes the scripts in /etc/rc0.d to be executed in order and the last one is 'halt'. This seems reasonable, but the shutoff code for the UPS is in the halt script. everything else is already done ... including syslogd which is the thing that logs all the data for the shutdown. No, I couldn't change it to write to a file since the file systems are all remouted read only by that time. There was no way to tell what the heck wasn't happening.

I never managed to solve that problem, so I decided to send the turn off signal to the UPS earlier in the halt steps since the UPS gives me a grace period of over a minute of power after the signal; plenty of time to finish the halt process. To this end, I created a little script to add to the shutdown process that would sense the power failure from apcupsd and send the signal using the scripts that already come with the software. I couldn't get the script to be run by systemctl.

Yes, I spent hours looking on the web for what was preventing it from being used, and found other folk that had the exact same problem. There were exactly zero actual solutions. Lots of talk about run levels, LSB's, running update-rc.d, keeping certain little things out of the script, but nothing definitive that would work. I kept reducing the stuff in the script until I had almost nothing in there and it still wouldn't get run during the shutdown and halt process. What I finally wound up with before I gave up on this idea was:

#! /bin/sh
### BEGIN INIT INFO
# Provides: davetesting
# Required-Start:
# Required-Stop:
# Default-Start:
# Default-Stop: 0
# Short-Description: Dave Testing
# Description: Just testing this thing
### END INIT INFO

PATH=/sbin:/bin
echo "Dave Testing in aaa"

echo "Dave inside aaa before the file thing"
echo $1
echo "Dave inside aaa got a $1"

I put my name in there so I could find it in the syslog, but it didn't matter. The script simply wasn't getting run. What was most annoying is that all of the similar questions I saw on the web were simply unresolved. The other folk apparently just gave up and did something different. That's the same tactic I took.

I saw that the script to stop the apcupsd daemon was actually running, so I put a little test code in there to see what would happen. The test code was executed and did exactly what it was supposed to do. Here was my hook into getting it working since the 'right way' didn't work and my attempt at a separate script didn't either.

The way apcusb works is to sense a power failure signal from the UPS, then create a flag file to be read later. After the daemon is stopped, it should be called again after the file systems are mounted read only with a parameter telling it to not run as a daemon, but instead, send the power down signal to the UPS. This little action is controlled by the presence of a flag file. I took that code from the init.d script for halt and put it in the script that starts and stops apcupsd. Of course that means the file systems are not read only and leaves the possibility of a problem, but since the UPS gives me over a minute grace, there won't be any problem; the Pi would have long since halted.

Then when the power comes back up, the UPS waits a little bit, restores power to the Pi and then the normal boot process gets going. During the boot process the flag file is removed so everything is back to normal waiting for the next storm.

Here's the init script that I came up with:

#!/bin/sh

### BEGIN INIT INFO
# Provides: apcupsd
# Required-Start: $remote_fs $syslog
# Required-Stop: $remote_fs $syslog
# Should-Start: $local_fs
# Should-Stop: $local_fs
# Default-Start: 2 3 4 5
# Default-Stop: 0 1 6
# Short-Description: Starts apcupsd daemon
# Description: apcupsd provides UPS power management for APC products.
### END INIT INFO

PATH=/usr/local/sbin:/usr/local/bin:/sbin:/bin:/usr/sbin:/usr/bin
DAEMON=/sbin/apcupsd
CONFIG=/etc/default/apcupsd
NAME=apcupsd
DESC="UPS power management"

test -x $DAEMON || exit 0
test -e $CONFIG || exit 0

set -e

. $CONFIG

echo "Dave is in ups code messing around"
echo "Dave found $1 "
if [ -f /etc/apcupsd/powerfail ]; then
echo "Dave Found powerfail"
else
echo "Dave No powerfail Found"
fi

if [ "x$ISCONFIGURED" != "xyes" ] ;
then
echo "Please check your configuration ISCONFIGURED in /etc/default/apcupsd"
exit 0
fi


case "$1" in
start)
echo -n "Starting $DESC: "

rm -f /etc/apcupsd/powerfail

if [ "`pidof apcupsd`" = "" ]
then
start-stop-daemon --start --quiet --exec $DAEMON
echo "$NAME."
else
echo ""
echo "A copy of the daemon is still running. If you just stopped it,"
echo "please wait about 5 seconds for it to shut down."
exit 0
fi
;;

stop)
echo -n "Stopping $DESC: "
start-stop-daemon --stop --oknodo --pidfile /var/run/apcupsd.pid || echo "Not Running."
rm -f /var/run/apcupsd.pid
echo "$NAME."
if [ -f /etc/apcupsd/powerfail ]; then
echo "Dave Doing powerfail"
/etc/init.d/ups-monitor poweroff
fi
sync; sync;
;;

restart|force-reload)
$0 stop
sleep 10
$0 start
;;

status)
#/sbin/apcaccess status
$APCACCESS status
;;

*)
N=/etc/init.d/$NAME
echo "Usage: $N {start|stop|restart|force-reload}">&2
exit 1
;;
esac

exit 0

It's called apcupsd (duh) and, after running update-rc.d to create init links shows up in rc0.d as K01apcusbd. You'll have to scroll down a bit to find what I changed. I put my name in there so I could easily find the debug I added when prowling around in syslog. Needless to say, with booting it and killing it a hundred times, syslog got really large, so finding a line in there was a problem. The flag file is called 'powerfail' and if it's there, I cause the UPS to shut down. 

No, it isn't the 'correct' way to do this, but since I just couldn't find enough information to do it 'correctly', ... I hacked it.

I'm going to install apcupsd on my other Pi's because they can run as slaves to the one I already did. Apcupsd has a supper cool feature in that it can talk to other instances of itself on other machines and cause them to halt as well. Since my UPS up in the attic runs for 45 minutes after a power failure, I'll set this machine to run for 40 minutes then tell the other ones to shut down. At 42 minutes, I kill the power to the UPS, and everything should be just fine. 

I'm left with a nagging lack of understanding why the scripts don't work as they come from Raspberry Pi and apcupsd, and why I couldn't get my own version of a init.d script to work, but my particular problem is solved. If I ever figure it out, or someone points it out, I'll update this to reflect what really 'should' be done.

Now to implement the networked shutdown for the other machines and see what doesn't make sense there.

I Really, Really Hate the SD Card in the Raspberry Pi

$
0
0
so much so, that I tried the beta version of the Boot From MSD (mass storage device) changes the Pi folk blogged about recently.

TL;DR version: It didn't work for me because I messed up, but I found another solution that is pretty darn compelling in the process of trying it out.

First, I found the Pi blog post here <link>, and read it over about three hundred times because it was the kind of thing I've been fighting for years now. Then, in typical form I got on Amazon and ordered a solid state disk and a little box to hold it and adapt it to USB.

Wait, before you go off and do the same thing I did, check out the link above and read the rest of this post. Also, the reason I said to use my link is because it points to the 'official' post about the boot from MSD, there are a lot of copies out there on the web and some of them are wrong. Go to the real source and start from there. I won't go into the details of what to do since I would only be copying someone else's hard work and I might make a mistake that would screw you up.

Here's the hardware I'm using:


These things cost me about $35, and I'm sure I could have gotten them cheaper if I was willing to wait for a boat from Taiwan, but I wanted to try this out right the heck now.

I went into Raspberry Pi's github repository <link> for the instructions and followed them exactly on my Pi 3B, and of course, it didn't work. Not because the instructions were bad, but because, in exuberance, I ordered a USB 3.0 device. They specifically say they don't support USB 3 and I just ignored that when I looked for the stuff I needed. However, it impressed on me something that I had overlooked way back when I tried a USB stick to overcome the problems with SD cards.

You ONLY NEED TO BOOT FROM THE SD CARD !! You don't need to run with it. That means, you put the boot stuff on the card, boot from it, and then ... get ready for this ... you mount it READ ONLY so a power failure won't corrupt the card because of files left open when the little guy dies. If you don't write to the card, it won't get messed up.

Sure, there will be a thing or two to consider doing this, for example when I do an update-upgrade (shudder), it will probably fail if there are changes to the boot code. Fine, I'll just make a note to myself to remember to remount the boot file system RW before I do that; or more likely, I'll fix it after the upgrade fails with some obscure error message. I'm actually running one of my little machines this way right now and it seems to be doing fine, and it boots awesomely fast compared to the SD card.

I've pulled the power plug a few times to see what happens, and YES darn it, I managed to corrupt the file system on the SSD. But, and this is a really big thing to me, fsck fixed it and it just kept on keeping on. I hardly noticed the problem.

Let's think about this a bit more. I don't have to even think about the long tedious process of backing up the SD card any more. I just make a couple of copies of Raspbian lite on cheap little SD cards just big enough to hold it and stick them to the wall taped to a 3x5 index card with a clear label I'll remember later. The SD card dies because of some random act, I grab another card, plug it in, and away the Pi goes because all the stuff that really matters is on the SSD. I can also use this technique on any of the Pi's I have, even the oldest. You just need to be able to read the SSD to finish the boot process; I don't need a whole system on the SD card. An unexpected benefit of this is that you have a fully boot-able system on the SD card that you can use to repair something if you need to.

Here's the cmdline.txt from the /boot on my Pi3B:

dwc_otg.lpm_enable=0 console=serial0,115200 console=tty1 root=/dev/sda2 rootfstype=ext4 elevator=deadline fsck.repair=yes rootwait

And the entry I have in fstab to set the boot to read only:

/dev/mmcblk0p1  /boot           vfat    ro,auto,user,exec,async  0       2

I'm not sure that this fstab entry is totally correct, but it gets the job done; root can't write to the boot partition. I keep two cmdline.txt files for backup in the /root directory: cmdline.txt.ssd for ssd boots, cmdline.txt.sd for sd card boots. I just copy whichever I need to cmdline.txt so I don't have to look up the weird name mmcblk0p1 each time I test something in this area.

To back up the SSD, just do a network 'dd' to a big disk somewhere else, or a file by file copy, rsync, something along those lines. I can even automate it now because the SSD is super quick and I'm not wearing it out the same as with an SD card. My little machine may be a little behind, but the data is stored on my NAS, and who cares if a log file got out of date. I'll definitely be looking into that in the next couple of weeks (well maybe).

I could totally eliminate power fail corruption for all the machines I want to someday have if I can come up with a house-wide power-fail shutdown idea that doesn't include $60 UPS devices out in the yard. Remember, my power goes out every time the weather sneezes, or a random drop of water falls from the sky. I've gone through several SD cards along the way. I tried a USB card to solve the problem, but the USB card died in a particularly annoying fashion <link>. I won't go that route again.

I want to step through the requirements for a UPS of some kind so you folks understand (and maybe suggest something):

1. cheap

2. It has to sense power failure and tell the Pi to halt while holding power on
for a minute or more while the Pi actually halts.

3. It has to turn power off to the Pi.

3. It has to sense power coming back, wait a bit for those messy power failures, and supply power to the Pi if it has turned the power to the Pi off.

4. Small

5. cheap

Requirement 3 is important because there is no power management on the Pi. The only way out of a halt condition is to cycle the power. Requirement 4 is important because the power can bounce around a bit and I don't want a bunch of half boots where the Pi has just enough time to start booting before the power goes out again.

I've thought a bit about a little Arduino to do this job for me. If I combine it with one of those cell phone power extenders and a good wall wart, I might be able to come up with something suitable.

Now, I'm going to check out the Chinese vendors for really good buys.

I'm Still Hung Up On Power Failures, but Suppose

$
0
0
OK, OK, maybe I'm a little OCD at times, but that can be a good thing. Folk have been making suggestions, and there have been some interesting pointers given to me, but none of them pass the test. But one suggestion caused a brain storm a little while ago.

A tiny bit of background. It's easy to control a relay or a light, what's hard is the smarts to know when to turn it on, or off. Sometimes this gets pretty complicated. Turn the sprinklers on at 10PM but only if the ground is dry and rain isn't predicted tonight. Turn the porch light on when someone approaches but not during the day. Turn the bathroom light on when someone enters the room, but not if it's after bedtime. We all have problems like that, and the problem is that every time we want to add a little more smarts to the device, we have to do some code and get it on the machine. That often means taking the device out of the box or whatever it's in and carrying it somewhere to reprogram it. Suppose I'm reprogramming something in the attic? It would totally suck having to crawl up there and modify it. Raspberry Pi's are great for this, just use a terminal program like Putty and connect to it over wireless. You can change things, try them, generally mess around until you get what you want and never have to lug the laptop out to the barn to plug it into the chicken feeder.

Suppose I split the work between two computers? One would be fully protected by a UPS that can do all the stuff I need, and another that can survive power failures, but only does the controlling. Let's take a specific but reasonably simple example: sprinklers. I don't need them, but other folk do, so let's take a case of a yard with 4 stations that need to be controlled.

I go out and get one of those relay boards and an Arduino to run it. I can put that in a weather proof box and stick it out close to the sprinkler valves. I will have a power supply wall wart running to it and an XBee to communicate. Arduino's handle power failures well since they have their software in ROM. I only need four command sets:

Relay one on-off
Relay two on-off
Relay three on-off
Relay four on-off

That code would be really easy to put together and implement. Then, I get a Raspberry Pi to send the commands and handle timing and such. I could easily put together menu screens to set the various on-off times, keep track of when they were run, etc. The Pi could be the ultimate sprinkler controller. Of course the Pi would be in a safe place with its power under the monitoring of a UPS that has the correct features.

Let's get a little more complex and consider a swimming pool controller. That would need more relays and possibly some really special features. The basic things I would need in my case would be:

Motor on-off
Fountain on-off
Waterfall on-off
Light on-off

Darn, doesn't that look exactly like the sprinkler control?  Now let's get a little bit more sophisticated and add control to the motor speed and the solar heater. Thinking about it a bit, I only need to add temperature readings for the water and the sun light on the roof to control the solar. Then for the motor, I only need to send motor commands and read their response. I've done all those things with my temperature sensor and pool control projects.

Take the sprinkler idea a bit further by adding some moisture sensors in strategic places with an XBee to transmit the data back to a Pi that figures out what needs to be done and sends back commands. Once again, the brains are in a protected spot with the actual worker computer somewhere else. The Pi could have elaborate software that looks pretty to control the pool and all the features could be made available to a web interface. That would be a fun project, but we might have to resort to battery powered devices to get to some of the hard to reach places.

One of my dreams is to monitor the temperature in each room, gather it in a central place, then control the heat pumps and air handlers intelligently to move heated or cooled air around the house. Little devices that use ROM and can send data would need to be placed in each room, then another simple computer would be placed in each air handler to actually control the fans, compressors and changeover switch. A Pi would be used to look at the data and do something appropriate. I would be able to use any program language or piece of software to develop the smart part from anywhere I feel comfortable working.

So, the various Arduinos would be worker computers that run software that doesn't need to be changed unless I want to add some hardware feature; they do just fine if the power is pulled. The Pi's would be more sophisticated and would handle all the real decisions. They would be backed up automatically and protected from nasty power crap. It would expand my XBee network, but I've got lots of bandwidth there. The other really great thing is that the Pi's can be programmed and reprogrammed any time I want without lugging a laptop out to the sprinkler junction or up into the attic. The PI's could send mail, sms, whatever is needed, heck they could send a signal to an alarm bell just like the big systems. This idea has been sitting right in front of me forever.

I just needed a nudge or two from my readers. Thanks.

Raspberry Pi, More About Installing a SSD

$
0
0
I just finished helping a reader get an SSD (solid state drive) running on his Pi, and realized that the documentation that the Pi folk provided <link>, while correct, left some things kinda hanging for people doing this. Mainly, what to expect when you type the various commands, basically what to expect while actually doing it. Don't misunderstand, they didn't mess anything up, or leave something out, they did a great job, but some of us dweebs can get lost in the responses and such that come back.

I saved key parts of hooking up a SSD to a USB port and getting the system over to it, then booting from it, to serve, both as an extended example, and as notes to myself for next time. Yes, I read my own blog to see what the heck I did last time.

So, you get yourself an SSD and some kind of enclosure to hold it. I went to Amazon and grabbed one of the cheapest combinations I could find and used that. I wound up with two of them due to a shipping problem. Actually, this is a cute story, so I'll briefly tell you about it.

I ordered a drive and USB enclosure and then waited for it to come in. It didn't. The Amazon order said it was delivered, but it wasn't on my porch or in the box down the road. Naturally, I called Amazon and complained. They immediately refunded the money and put in an expedited order for new devices. I got the new devices in two days. That was absolutely great; I love Amazon customer service a lot.

A week later, the neighbor came over with the original package. They just moved in and forgot about it until it turned up again. I thanked him then paced around wondering whether I should tell Amazon, or just keep the drive. You guessed it, conscience got to me and I called Amazon. I had a choice, send it back (they pay shipping) or buy it. I bought it; since I actually need three of them, might as well keep this one. Sure, it's more expensive than others I can get, but I already had it in my greedy hands. That's the drive I used in the explanation below. I still want to get a really cheap one and try the entire process again with cheaper hardware, but that can wait for later.

Anyway, you have your new SSD in hand and want to put the Pi software on it and use the thing, so plug it in and partition it. Since this is the first USB drive, it will be recognized and assigned /dev/sda; if you have another drive, unplug it or figure out what the drive shows up as. Then:


pi@housemonitor:~$ sudo parted /dev/sda

GNU Parted 3.2

Using /dev/sda

Welcome to GNU Parted! Type 'help' to view a list of commands.

(parted) mktable msdos

(parted) mkpart primary fat32 0% 100M

(parted) mkpart primary ext4 100M 100%

(parted) print

Model: ASMT 2115 (scsi)

Disk /dev/sda: 63.4GB

Sector size (logical/physical): 512B/512B

Partition Table: msdos

Disk Flags:

Number  Start   End     Size    Type     File system  Flags

 1      1049kB  99.6MB  98.6MB  primary  fat32        lba

 2      99.6MB  63.4GB  63.3GB  primary  ext4         lba

(parted)

Information: You may need to update /etc/fstab.

pi@housemonitor:~$


The things I typed in are bold so you can see them easily and you have to type control D to get out of parted. Folk that have done this before will wonder why I created a boot partition when I'm not going to use it. Well, I figure the work on alternate boot capabilities will continue and I want a boot partition on there in case I want to use it later. It doesn't take much space, and I have way more than I need, so why not? Occasionally I actually think ahead.

Now we have to put file systems on the new partitions. We do that with mkfs and here's what it looks like:


pi@housemonitor:~$ sudo mkfs.vfat -n BOOT -F 32 /dev/sda1


mkfs.fat 3.0.27 (2014-11-12)


pi@housemonitor:~$ sudo mkfs.ext4 /dev/sda2


mke2fs 1.42.12 (29-Aug-2014)


Creating filesystem with 15442176 4k blocks and 3866624 inodes


Filesystem UUID: f1df7b73-5872-43b8-b0da-29d6d139557d


Superblock backups stored on blocks:


        32768, 98304, 163840, 229376, 294912, 819200, 884736, 1605632, 2654208,


        4096000, 7962624, 11239424


Allocating group tables: done


Writing inode tables: done


Creating journal (32768 blocks): done


Writing superblocks and filesystem accounting information: done


pi@housemonitor:~$


This makes the filesystems on both the /BOOT and / partitions. Now you're ready to put something on there. In most cases, you want to take a running system, clone it on the new drive, and then use it without having to change a bunch of stuff. So, let's get them mounted so we can copy what we already have to the new drive.

pi@housemonitor:~$ sudo mkdir /mnt/target
pi@housemonitor:~$ sudo mount /dev/sda2 /mnt/target/
pi@housemonitor:~$ sudo mkdir /mnt/target/boot
pi@housemonitor:~$ sudo mount /dev/sda1 /mnt/target/boot/

This mounts both of the new partitions. Next, you may have to install rsync; it depends on which version of Jessie you started with. Jesssie lite doesn't come with rsync, while the full version does. I had it on one Pi and not on the other. If you need to go get it do an update first to be sure you get the latest.

sudo apt-get update

There will be a ton of output from this depending on how recently you updated. I always get lots of stuff since I rarely update the machines. Then actually install rsync:

sudo apt-get install rsync

This will also have lots of output. You've done this before, you know what you're going to get. Now, copy all the stuff from the SD card to the new drive:

sudo rsync -ax --progress / /boot /mnt/target

Not only will this produce voluminous output, it takes a good long time. If you have a minimal system like Jessie lite, you can wait around for it. If you have the full system with a lot of installed packages, take a break. I fed the dog, put on some laundry, called the telephone company and it still wasn't done.

Since all my Pi's are run headless (without a monitor or keyboard), I had to generate new keys for ssh. The easy way to do this is to mount the new partitions and pretend they are the real thing. If that's unclear, take a look at the documentation for chroot:

pi@housemonitor:~$ cd /mnt/target
pi@housemonitor:/mnt/target$ sudo mount --bind /dev dev
pi@housemonitor:/mnt/target$ sudo mount --bind /sys sys
pi@housemonitor:/mnt/target$ sudo mount --bind /proc proc
pi@housemonitor:/mnt/target$ sudo chroot /mnt/target
root@housemonitor:/#


Now, actually regenerate the keys. This warns that it will take a while to do this, but compared to the rsync above, it's nothing.

root@housemonitor:/# rm /etc/ssh/ssh_host*
root@housemonitor:/# dpkg-reconfigure openssh-server
Creating SSH2 RSA key; this may take some time ...
2048 1b:51:b1:64:a3:ad:2a:3c:3f:54:b0:7e:e5:e8:b2:76 /etc/ssh/ssh_host_rsa_key.pub (RSA)
Creating SSH2 DSA key; this may take some time ...
1024 fc:75:4e:17:77:f1:7e:4c:50:47:95:d7:94:3a:24:31 /etc/ssh/ssh_host_dsa_key.pub (DSA)
Creating SSH2 ECDSA key; this may take some time ...
256 3f:56:f8:02:92:fe:c6:a5:3d:3b:b7:58:f1:f1:2a:0b /etc/ssh/ssh_host_ecdsa_key.pub (ECDSA)
Creating SSH2 ED25519 key; this may take some time ...
256 cc:ba:5e:54:df:52:19:1c:ec:be:96:39:ca:55:3b:8a /etc/ssh/ssh_host_ed25519_key.pub (ED25519)
[ ok ] Restarting OpenBSD Secure Shell server: sshd.
root@housemonitor:/# exit
exit
pi@housemonitor:/mnt/target$

Whew ! Unmount the new stuff which will make sure it gets written out, and then we'll make changes to the boot files to complete the process.

pi@housemonitor:/mnt/target$ sudo umount dev
pi@housemonitor:/mnt/target$ sudo umount sys
pi@housemonitor:/mnt/target$ sudo umount proc
pi@housemonitor:/mnt/target$

This next part may confuse you some. I've noticed that all the examples out there don't show the mistakes we all make in following some tutorial or written process. I decided, for one window, to show what actually happened during some of the changes I made; this is where I edited the cmdline.txt and fstab files. I did a cat of the file contents before and after since the editor clears the screen of the changes:

pi@housemonitor:/mnt/target$ cd /boot
pi@housemonitor:/boot$ ls
bcm2708-rpi-b.dtb COPYING.linux LICENCE.broadcom
bcm2708-rpi-b-plus.dtb fixup_cd.dat LICENSE.oracle
bcm2708-rpi-cm.dtb fixup.dat overlays
bcm2709-rpi-2-b.dtb fixup_db.dat start_cd.elf
bcm2710-rpi-3-b.dtb fixup_x.dat start_db.elf
bootcode.bin issue.txt start.elf
cmdline.txt kernel7.img start_x.elf
config.txt kernel.img System Volume Information
pi@housemonitor:/boot$ cp cmdline.txt cmdline.sd
cp: cannot create regular file ‘cmdline.sd’: Permission denied
pi@housemonitor:/boot$ sudo !!
sudo cp cmdline.txt cmdline.sd
pi@housemonitor:/boot$ sudo vi cmdline.txt
pi@housemonitor:/boot$ cp cmdline.txt cmdline.usb
cp: cannot create regular file ‘cmdline.usb’: Permission denied
pi@housemonitor:/boot$ sudo !!
sudo cp cmdline.txt cmdline.usb
pi@housemonitor:/boot$
pi@housemonitor:/boot$ cd /mnt/target/etc/
pi@housemonitor:/mnt/target/etc$ cat fstab
proc /proc proc defaults 0 0
/dev/mmcblk0p1 /boot vfat defaults 0 2
/dev/mmcblk0p2 / ext4 defaults,noatime 0 1
# a swapfile is not a swap partition, no line here
# use dphys-swapfile swap[on|off] for that
pi@housemonitor:/mnt/target/etc$ sudo vi fstab
pi@housemonitor:/mnt/target/etc$ cat fstab
proc /proc proc defaults 0 0
/dev/mmcblk0p1 /boot vfat ro,auto,user,exec,async 0 2
/dev/sda2 / ext4 defaults,noatime 0 1
# a swapfile is not a swap partition, no line here
# use dphys-swapfile swap[on|off] for that
pi@housemonitor:/mnt/target/etc$

I'm constantly forgetting to use 'sudo' to edit system files. It really gets annoying making the same mistake over and over again. 

Now, the trial by fire. Notice above that I saved the cmdline.txt file for the SD card. That's just in case this doesn't work. If it fails all I have to do is copy the file back in place on a PC (remember, the BOOT partition is msdos) and I'm back to the SD card and can fix whatever I messed up. So, let's unmount the new disk and reboot the Pi:


pi@housemonitor:/mnt/target/etc$ cd

pi@housemonitor:~$ sudo umount /mnt/target/boot

pi@housemonitor:~$ sudo umount /mnt/target

pi@housemonitor:~$ sudo reboot


I usually find myself gritting my teeth at this point, and honestly, the Pi got into one of those situations where it wouldn't connect to the network. I had to walk over and cycle power to get it up. This happens to me once in a while, and the Pi will almost always come up after some period of retrying. I just got tired of watching it blink while it tried to connect. But, it came up and I did a 'df' to show the new disk was mounted and the SD card was read-only.

login as: pi
pi@192.168.0.205's password:

The programs included with the Debian GNU/Linux system are free software;
the exact distribution terms for each program are described in the
individual files in /usr/share/doc/*/copyright.

Debian GNU/Linux comes with ABSOLUTELY NO WARRANTY, to the extent
permitted by applicable law.
Last login: Wed Sep 28 09:09:58 2016
pi@housemonitor:~$ df
Filesystem 1K-blocks Used Available Use% Mounted on
/dev/root 60666940 3968532 53593592 7% /
devtmpfs 218416 0 218416 0% /dev
tmpfs 222688 0 222688 0% /dev/shm
tmpfs 222688 5052 217636 3% /run
tmpfs 5120 8 5112 1% /run/lock
tmpfs 222688 0 222688 0% /sys/fs/cgroup
/dev/mmcblk0p1 61384 20400 40984 34% /boot
tmpfs 44540 0 44540 0% /run/user/1000
pi@housemonitor:~$ ps ax|grep python
455 ? Sl 0:09 /usr/bin/python /home/pi/src/house/updateoldxively.py
458 ? S 0:01 /usr/bin/python /home/pi/src/house/savehouse.py
461 ? Sl 0:05 /usr/bin/python /home/pi/src/house/healthcheck.py
462 ? Sl 0:03 /usr/bin/python /home/pi/src/house/events.py
464 ? Sl 0:05 /usr/bin/python /home/pi/src/house/iriscontrol.py
466 ? S 0:01 /usr/bin/python /home/pi/src/house/mqttlogger.py
468 ? Sl 0:08 /usr/bin/python /home/pi/src/house/monitorhouse.py
470 ? Sl 0:04 /usr/bin/python /home/pi/src/house/wemocontrol.py 4
807 pts/0 S+ 0:00 grep python
pi@housemonitor:~$
I also did a 'ps' to check that the processes I usually run started automatically. Everything worked.

So folks, here's a real example of how to do this with a lot of the text that comes along with it. It took me less than a morning, even with the long rsync process. I didn't bother backing up the SD card since I was only changing the one file, cmdline.txt, on it and even that was backed up. The big advantage to me is that the SD card is fully bootable and is very unlikely to fail since it is never written to. I can use it to fix something if I need to at a minutes' notice.

Have fun.
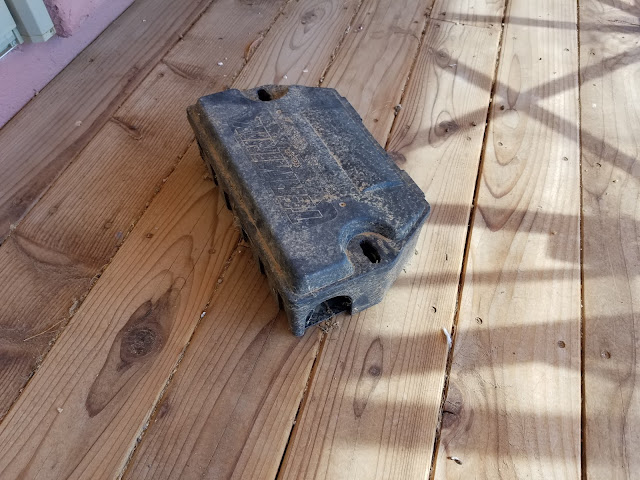
So, My Raspberry Pi Web Server Was Running Slow

$
0
0
I was sitting on a bar stool showing off my Pi web server that controls my house and had to wait 15-20 seconds for each screen change. Loading graphs was painfully slow and would pause in the middle with only half the graph showing. It was embarrassing. When I got home, I took a look and the load average was up in the double digits; something I had never seen before. Obviously, there was some process or other out of control that needed to be fixed. I was wrong.

Granted, it's my oldest Pi; a Pi 1 that I just keep because it's easier than bringing up my Pi3B to do the same job. I recently put a SSD on it, and it logs to a database server up in the attic, so it's been fast enough. Now, it was just crawling along.

When I went looking for what was causing it I found someone out there on the web was loading my data as fast as the process could be run. Don't misunderstand, there's nothing secret there and folk visit my site all the time to see what's different from the last time, and I've had something similar happen before; it was quite innocent. What most people don't realize is that a site that automatically updates by doing a periodic get, when put in background, will continue to update. So, you visit one of the news sites, hit the back button down on the bottom of the phone, the app disappears and you go do something else, and the app continues to run updating the screen you can't see. This can cause data overages and such, but the app is ready when you come back. This shows up in my logs as someone on the site for a very long time.

Almost all sites are polite about this auto-update and only update on a multi-minute schedule; I have my site update every 10 seconds because I want to double check and see that the garage door actually closed like it was supposed to. What was happening was someone had set up a loop that would grab the data again as soon as it was delivered. That caused a lot of database read activity and slowed the machine down a LOT. Of course, I didn't realize this at first and assumed I needed to check the efficiency of the data gathering steps.

I have a php script that gathers the data from my database and returns it to the web user called housedata.php. It's a rather simple implementation, so I took it and started timing the various operations by commenting out pieces and timing it using the 'time' command in bash. The stupid little process was taking 4.75 seconds on average to finish at first, but after some database query changes, it went way down; but all that did was allow the person out there to call my machine faster.

I looked at excluding the person by IP address using the features of the apache2 web server and succeeded in stopping the interaction quite nicely. That made me think about what else might be going on, so I took a closer look at the logs. There was the usual script kiddies trash looking for 10 year old vulnerabilities, search engines prowling around, and days worth of this person beating on my machine. I had fixed the problem, so I improved the speed of housedata.php a little more and called it done. The next morning, the person was right back in there with a slightly different IP address doing the same thing.

I added the new address to the web server exclusions and noticed that it was in a subnet of the internet provider that was being used. Ha! I excluded the entire subnet to stop the problem. The problem with excluding the IP addresses with the web server was that the web server starts a process for each hit. That takes time and machine resources, not a lot, but enough to notice over time. It looked like it was time to actually bring up a firewall to protect the little machine.

I already knew about 'iptables', but have you ever tried to use that thing? It's really hard to set up, and I could mess it up pretty badly leaving holes where there shouldn't be and locking myself out of my own machine. I shuddered at trying to get that working without a months worth of research, but then discovered 'ufw' a tool designed to help with that process. I did the dreaded apt-get update command and then an apt-get install ufw so I could try it out. Notice that I did NOT use apt-get upgrade! I'm getting really tired of having too much stuff on my machine replaced by well meaning folk out there. The last time I did that I wound up with a new slightly incompatible operating system (jessie).

Since I run headless (no keyboard or console), I was afraid of actually enabling the firewall since it would exclude port 22 and I wouldn't be able to get into the machine to do anything without dragging it to a TV set somewhere and poking around for hours sitting on the floor in front of it. Fortunately, the folk that put the package together left a note in one of the configuration files about this very thing and I did what they suggested. Gritting my teeth in expectation of failure, I started the process and it warned me that ssh sessions could be interrupted and asked for confirmation. I gritted a little harder and answered 'Y'.

It came up just fine and didn't affect the ssh session at all. I was on my way.

If you have to do this, one thing you'll find annoying is the huge amount of introductions, tutorials, promotions, and examples out there on the web that don't tell you what you want to know. Sure they tell you stuff that is valuable, but I didn't find a single one that covered what I needed to do; it was all trial and error. Painful trial and error. After about an hour I came up with an idea: look at the darn log file created by ufw to see what was going on. On the Pi, the log records are mixed in with other stuff in the file /var/log/messages. So, I set up a way to watch it and see what was happening:

tail -f /var/log/messages | grep UFW

After watching a while for the various things that were being dropped, changing the configuration, watching some more, I got it working perfectly for my purposes. I had a little annoyance with the order of the rules. See, when ufw (actually iptables, ufw is just an interface) sees a packet, it steps through its rules in order and stops when it satisfies the first one. So if you allow access to port 80 as the first line, you can't exclude a specific IP address later; it already let the packet through and stopped looking. So, put the stuff you want stopped first and then the stuff you want to allow later.

I allowed all the machines on my local network to get to the web server for various things, but only open port 80 outside the house. Here's the list I'm currently using:

pi@housemonitor:/var/log/apache2$ sudo ufw status numbered
Status: active

To Action From
-- ------ ----
[ 1] 22 ALLOW IN 192.168.0.0/16
[ 2] Anywhere DENY IN 69.145.122.0/24
[ 3] Anywhere DENY IN 180.16.15.0/24
[ 4] Anywhere DENY IN 180.76.15.0/24
[ 5] 80 ALLOW IN Anywhere
[ 6] 3551 ALLOW IN 192.168.0.0/16
[ 7] Samba4 ALLOW IN 192.168.0.0/16
[ 8] 224.0.0.251 ALLOW IN 192.168.0.0/24
[ 9] 224.0.0.1 ALLOW IN 192.168.0.0/24
[10] 22 ALLOW IN Anywhere (v6)
[11] 80 ALLOW IN Anywhere (v6)
[12] 3551 ALLOW IN Anywhere (v6)

pi@housemonitor:/var/log/apache2$

First, I allow port 22 from all internal addresses. Like I said, I worry about excluding my own access to the machine. Then a series of nets excluded because I saw them messing around. The 69.145.122.0/24 address is where the annoying traffic was coming from, the two addresses that start off with 180 are for a Chinese web crawler for a search engine. It was hitting my machine every 30 minutes from two different addresses that changed within that range. I don't mind search engines, but every 30 minutes? The IP version 6 stuff is the default, I haven't gotten to it yet.

Port 3551 is for my APC UPS that I wrote about recently. That device is working really well and controls the shutdown of all my Pi's so I want the machines to be able to interact. Of course I use Samba to move files around, so there's an entry for that. The two 224 addresses are for ARP and such, I put the entries in just to keep them out of the log.

As soon as I did that, my load level dropped to fractional numbers; the machine finally had time to actually do things.


Also, since the person out there was getting time outs from not being able to get a response from my machine, its hits dropped to every 30 seconds or so. These hits were dropped at the protocol level, so they don't cause me any problems at all.


This rather busy screen shot shows the hits roughly every 30 seconds trying to load stuff, and each of them gets dropped with no response. The really annoying thing is that this person is STILL trying to get in. I've been working on this for a few days now and this robot doesn't have the smarts to try something else. I know it's a 'bot because it goes directly after the data server code without going through the web page. After I finished with the changes I let the machine run overnight and looked again, neither the web crawler or the annoying 'bot got in.

Success !

At least so far. Sure, I'll get annoying traffic again, but now I know how to stop it and have the means to do it relatively easily.

Don't misunderstand, I don't mind people looking at the site at all; I encourage folk to take a look. It's there not only so I can close my garage doors, but to serve as an example and source of ideas and suggestions. I just ask that you don't set up scripts to mess around with it for days at a time, and until now, everyone has been really nice about it. Some of my (ahem) ideas have come from people looking around and suggesting things. I've saved many a kid from a bad grade in a computer science class because they can steal code from me. And, there have been a couple of seriously interesting term papers written based on things they found here.

I'm actually contributing ... well sort of.

One last thing came out of this exercise. I had to put in a fake 'index.html' page because of the various 'bots that want to prowl around the site. What happens is the 'bot goes for the web site and then uses the URLs inside the index page to find other stuff on the site. Then it tries various 'exploits' to break in and do something bad on each of the pages. If there is no index page, it tries to get a directory listing and from there it starts messing around. If you put in a dead end index page, it can't get a directory listing and there are no URLs in the page to leverage from; the bot gives up and moves on. The script kiddies and the constant data loading came to the attention of the web monitoring tools at my ISP and they started expiring my IP lease a couple of times a day to break up the traffic. Each time they did that, I was off the network for a short time while the DNS servers were updated. I have code in place for this kind of thing, so I didn't have to do anything, but it got annoying. We'll see if my changes remove this problem.

All in all, this was both annoying and fun. I got to learn about new stuff, make changes that work really well to some of my code and have something new to brag about when I go to the bar.
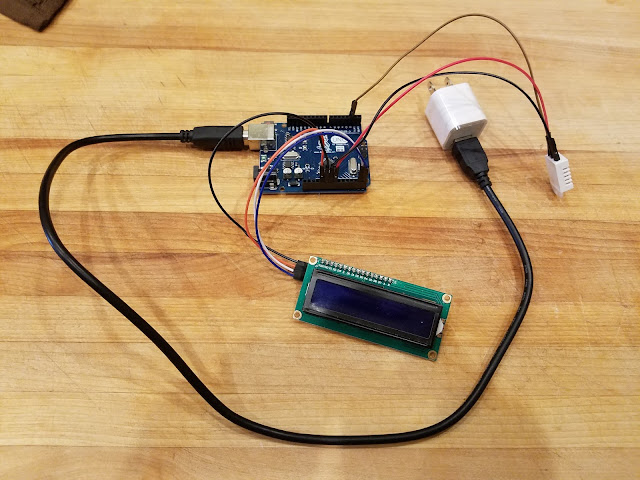
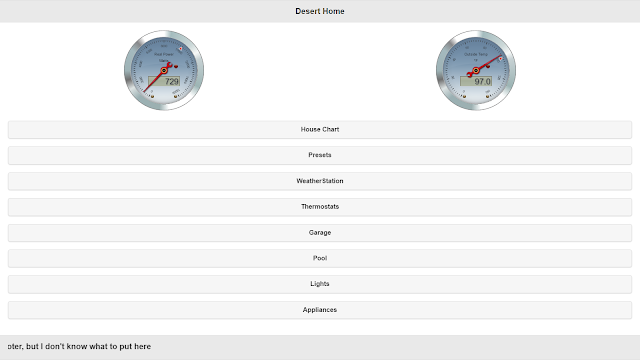
Viewing all 218 articles
Browse latest View live