Earlier this year Hackster.io had a contest looking for good internet of voice examples using a Raspberry Pi and an Amazon Echo <link>; one guy Nick Triantafillou entered with a simple weather application that would have the Echo say the current temperature and humidity taken from a DHT22 connected to his Pi <link>. This sounded like the perfect place to start including an Amazon Dot (or maybe a few of them) into my house infrastructure. I'm not interested in the latest Twitter stuff, I don't follow Facebook and the streaming services I care about are already handled by my Roku, so this should be an interesting way to get my feet wetter in dealing with voice. I already tried voice on the Pi to try and control things, that was an abysmal failure <link>, and it would certainly be a fun thing to have around the house. So, I started stepping through his article. I like Nick's style and his instructions were clear enough to follow, so I just skipped the stuff about how to hook something to the Pi and got into the meat of hooking a Pi into Amazon AWS.
Go to https://aws.amazon.com/ and sign up for AWS; remember, this stands for Amazon Web Services and you may have already done this in the last post. Once you get in there you'll find a screen that shows the various services they provide. For now, lets take a look at what the charges are, as in money you will have to pay them to use this stuff. If you look around on the page, there is a selection for AWS Iot (Amazon Web Services Internet of Things), and if you go there, you can find the pricing. It's a bit convoluted to find, as pricing always is for web services, so here's the link to the page I found on it:
And you'll get back:
{
"endpointAddress": "yournumberswillbehere.iot.us-east-1.amazonaws.com"
}
Now you have a place to send data to and a policy to handle the data. You created and named a 'thing' and it's ready to use.
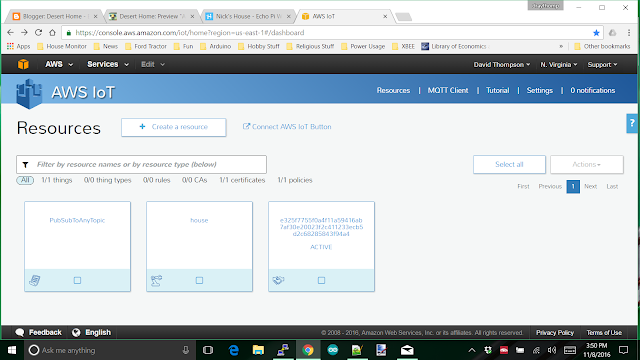
But, how the heck can you tell? Go to the AWS management console; you should be getting good with the names of things by now and sign in. Look at the black bar at the top, it should be 'N. Virginia' since we set up as 'us-east-1', but if it isn't use the selection and change it. Also up at the top in the black bar is 'Services' click on it and a huge drop down of services will show up. Choose 'AWS IoT and you should get a screen like this:
Go to https://aws.amazon.com/ and sign up for AWS; remember, this stands for Amazon Web Services and you may have already done this in the last post. Once you get in there you'll find a screen that shows the various services they provide. For now, lets take a look at what the charges are, as in money you will have to pay them to use this stuff. If you look around on the page, there is a selection for AWS Iot (Amazon Web Services Internet of Things), and if you go there, you can find the pricing. It's a bit convoluted to find, as pricing always is for web services, so here's the link to the page I found on it:
The prices they charge for stuff after you have used it for 12 months are here. Yes, it's free for the first year and after that they start charging you for the various services. However, look at the actual prices for the various features and breathe a sigh of relief since they charge in MILLIONS of transactions. I calculated that, if I use their services the same way I use them at home, it'll cost me a few cents a month. I really mean a few cents, maybe a quarter if I'm really pounding on the house. Probably more like a nickel or so a month. Heck, even I can afford that, and the first year is free. So, if you don't like it, cancel it before they start charging you.
At any rate, you've signed up for AWS and you can get the super secret stuff you need to go ahead with the configuration. If you don't like it, don't use it; they shouldn't charge you for just signing up and playing around, at least for the first year.
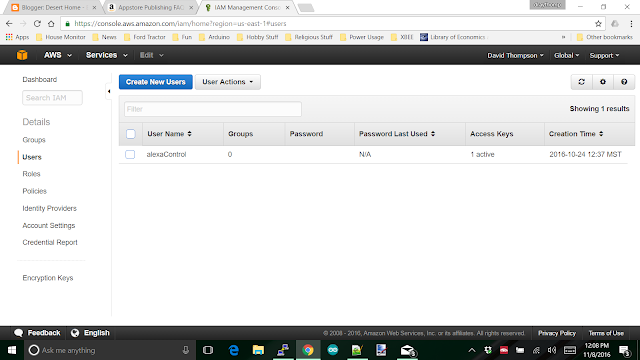
The very first thing you're going to need is a 'user'. To create a user that will be able to authenticate and use the various features, you use another Amazon Web Service IAM (Internet Access Management). This is where you'll poke in some permissions that will allow your Pi to assume the identity of the user you create and then upload temperature readings and such. At the AWS console, take a look around at the services and choose IAM and go there. Somewhere on that page is a button to create a user. These things move around on the screen depending on various criteria, so I can't tell you exactly where it will show up, but when I do it, it looks like this:
The very first thing you're going to need is a 'user'. To create a user that will be able to authenticate and use the various features, you use another Amazon Web Service IAM (Internet Access Management). This is where you'll poke in some permissions that will allow your Pi to assume the identity of the user you create and then upload temperature readings and such. At the AWS console, take a look around at the services and choose IAM and go there. Somewhere on that page is a button to create a user. These things move around on the screen depending on various criteria, so I can't tell you exactly where it will show up, but when I do it, it looks like this:
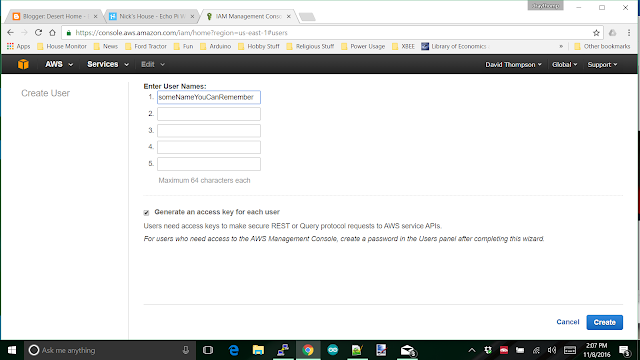
The 'alexaControl' user is the one I created to do things with. Create your own and you'll get a screen that looks something like this:
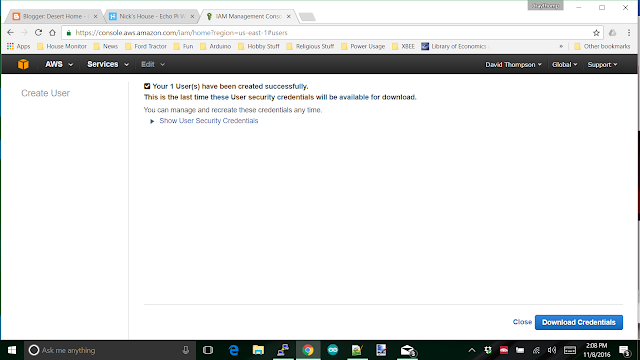
Hit the 'Create' button and you'll move to the next screen:
NOW, THIS IS IMPORTANT, click on the show credentials link. There is a secret shown that you won't be able to get again. You'll need both of the items in the next steps to create the thing. I took a screen shot so I wouldn't mess up entry of the items. I also did a copy and paste into notepad so I could copy them out. This is what they look like:
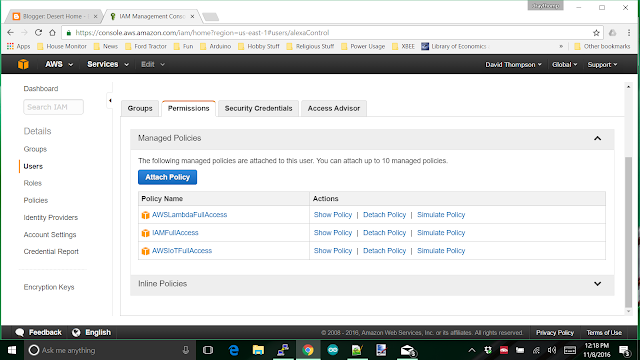
I didn't download the credentials. Close the screen and you'll see your new user, click on it to get a screen where you'll assign various permissions and such. You don't need a 'group', but you do need to add some permissions. Click on the permissions tab and you'll get something like this:
Permissions in AWS are handled by 'policy' documents that are JSON files that are read when something needs to be done that may have to have a permission. Attach the three policies you see in the screen shot above. That gives pretty much unlimited permission to the stuff you're going to create. You can always come back later after it works and whittle down the permissions to what is actually needed, but it's much easier not to have to fight those items when you're first trying to get it working.
After you look around a bit at what the other items are, you can leave this part of AWS and, start looking for the AWS IOT console. We won't be using it yet, but it's good to have it up so you can check it after the next part.
I mentioned last post that I stepped through the creation of a thing using the web based tools that Amazon provides, but then I ran into trouble figuring out how to get the stuff I needed on my Pi so I could actually use it. That's where Nick's article came in handy. He has a step by step implementation of the items needed. Of course, I didn't do it exactly the same way he did, I used what I wanted to have. So, let's step through creating a thing and the various certificates we need on the Pi:
First, create a new directory somewhere and 'cd' into it; you'll be creating files there and you want to be able to find them later. Load the huge hunk of software that Amazon provides as an interface to your machine. I simply used the defaults and let it install:
sudo pip install awscli
This will load the python version of the AWS Command Line Interface that we'll be using. Next, you want to configure it, the command is:
$ aws configure
Which will prompt you for the security items I told you to save above. It will also ask you for the 'region'. THIS IS ALSO IMPORTANT, use 'us-east-1' for the region. AWS has data centers globally, and normally, you'd choose one close to you, but for Alexa, you must choose us-east-1 which may show up as N. Virginia in a few places on Amazon.
Now aren't you glad you listened to me and saved the secrets from above? Now the steps you run through on the Pi to get it ready to connect:
Create a 'thing'
$ aws iot create-thing --thing-name "house"
I used the name 'house' for mine, yours could be anything you want.
Now you can list it and check that the command worked:
$ aws iot list-things
{
"things": [
{
"attributes": {},
"thingName": "house"
}
]
}
You'll need to use encryption, so create certificates and keys
$ aws iot create-keys-and-certificate --set-as-active \
--certificate-pem-outfile cert.pem \
--public-key-outfile publicKey.pem \
--private-key-outfile privkey.pem
This will have a lot of output to the screen, you can safely ignore it because it also creates files in the directory you're using that you will need later.
4. Get the certificate ARN which is the AWS Resource Name. You know you're in acronym hell when you're using acronyms made from acronyms. The ARN is going to be needed later, I highlighted it below:
$ aws iot list-certificates
{
"certificates": [
{
"certificateArn": "arn:aws:iot:us-east-1:926342229229:cert/58debbfe90fa58cad4df8426bdf3f20a71df7644437203e231b503b994dfb8f3",
"status": "ACTIVE",
"creationDate": 1467893789.688,
"certificateId": "58debbfe90fa58cad4df8426bdf3f20a71cf7644437203e251b503b994dfb8f3"
}
]
}
Word wrap kinda messed up the copy and paste above, but you get the idea. Download the root certificate from symantec. You'll need a root certificate and we get that from Symantec.com. If you want to know what a root certificate is and does, go look it up; the explanation is complex. To get it on the Pi:
$ wget https://www.symantec.com/content/en/us/enterprise/verisign/roots/VeriSign-Class%203-Public-Primary-Certification-Authority-G5.pem -O aws-iot-rootCA.crt
Now's a good time to discuss the certificates and keys you've accumulated. It's also a good time to round them up and keep them in a place you can remember and protect. Here's the list of my keys:
$ ls keys
aws-iot-rootCA.crt cert.pem privkey.pem publicKey.pem
You should have all of them as well. I keep them in a directory called 'keys' and will soon limit access to them to the root user.
Now we need to create a policy that will allow your Pi to do things by giving it permission. You do this by creating a file that you will feed to aws and it will, in turn send it up to AWS on Amazon. The file contents:
{
"Version": "2012-10-17",
"Statement": [{
"Effect": "Allow",
"Action":["iot:*"],
"Resource": ["*"]
}]
}
Just use an editor, copy the stuff between the braces (include the braces at the beginning and end) and name the file something you'll recognize. The date in there is important, it's the version of software at Amazon that is used, don't change it. I followed Nick's suggestion and called it 'PubSubToAnyTopic', then use the file in the next command:
$ aws iot create-policy --policy-name "PubSubToAnyTopic" --policy-document file://iotpolicy.json
You'll get back:
{
"policyName": "PubSubToAnyTopic",
"policyArn": "arn:aws:iot:us-east-1:704749107060:policy/PubSubToAnyTopic",
"policyDocument": "{\n \"Version\": \"2012-10-17\", \n \"Statement\": [{\n \"Effect\": \"Allow\",\n \"Action\":[\"iot:*\"],\n \"Resource\": [\"*\"]\n }]\n}",
"policyVersionId": "1"
}
Attach the principal policy you just created, using the arn highlighted from earlier:
$ aws iot attach-principal-policy --principal "arn:aws:iot:us-east-1:926342229229:cert/58debbfe90fa58cad4df8426bdf3f20a71df7644437203e231b503b994dfb8f3" --policy-name "PubSubToAnyTopic"
$ aws iot describe-endpoint
First, create a new directory somewhere and 'cd' into it; you'll be creating files there and you want to be able to find them later. Load the huge hunk of software that Amazon provides as an interface to your machine. I simply used the defaults and let it install:
sudo pip install awscli
This will load the python version of the AWS Command Line Interface that we'll be using. Next, you want to configure it, the command is:
$ aws configure
Which will prompt you for the security items I told you to save above. It will also ask you for the 'region'. THIS IS ALSO IMPORTANT, use 'us-east-1' for the region. AWS has data centers globally, and normally, you'd choose one close to you, but for Alexa, you must choose us-east-1 which may show up as N. Virginia in a few places on Amazon.
Now aren't you glad you listened to me and saved the secrets from above? Now the steps you run through on the Pi to get it ready to connect:
Create a 'thing'
$ aws iot create-thing --thing-name "house"
I used the name 'house' for mine, yours could be anything you want.
Now you can list it and check that the command worked:
$ aws iot list-things
{
"things": [
{
"attributes": {},
"thingName": "house"
}
]
}
You'll need to use encryption, so create certificates and keys
$ aws iot create-keys-and-certificate --set-as-active \
--certificate-pem-outfile cert.pem \
--public-key-outfile publicKey.pem \
--private-key-outfile privkey.pem
This will have a lot of output to the screen, you can safely ignore it because it also creates files in the directory you're using that you will need later.
4. Get the certificate ARN which is the AWS Resource Name. You know you're in acronym hell when you're using acronyms made from acronyms. The ARN is going to be needed later, I highlighted it below:
$ aws iot list-certificates
{
"certificates": [
{
"certificateArn": "arn:aws:iot:us-east-1:926342229229:cert/58debbfe90fa58cad4df8426bdf3f20a71df7644437203e231b503b994dfb8f3",
"status": "ACTIVE",
"creationDate": 1467893789.688,
"certificateId": "58debbfe90fa58cad4df8426bdf3f20a71cf7644437203e251b503b994dfb8f3"
}
]
}
Word wrap kinda messed up the copy and paste above, but you get the idea. Download the root certificate from symantec. You'll need a root certificate and we get that from Symantec.com. If you want to know what a root certificate is and does, go look it up; the explanation is complex. To get it on the Pi:
$ wget https://www.symantec.com/content/en/us/enterprise/verisign/roots/VeriSign-Class%203-Public-Primary-Certification-Authority-G5.pem -O aws-iot-rootCA.crt
Now's a good time to discuss the certificates and keys you've accumulated. It's also a good time to round them up and keep them in a place you can remember and protect. Here's the list of my keys:
$ ls keys
aws-iot-rootCA.crt cert.pem privkey.pem publicKey.pem
Now we need to create a policy that will allow your Pi to do things by giving it permission. You do this by creating a file that you will feed to aws and it will, in turn send it up to AWS on Amazon. The file contents:
{
"Version": "2012-10-17",
"Statement": [{
"Effect": "Allow",
"Action":["iot:*"],
"Resource": ["*"]
}]
}
Just use an editor, copy the stuff between the braces (include the braces at the beginning and end) and name the file something you'll recognize. The date in there is important, it's the version of software at Amazon that is used, don't change it. I followed Nick's suggestion and called it 'PubSubToAnyTopic', then use the file in the next command:
$ aws iot create-policy --policy-name "PubSubToAnyTopic" --policy-document file://iotpolicy.json
You'll get back:
{
"policyName": "PubSubToAnyTopic",
"policyArn": "arn:aws:iot:us-east-1:704749107060:policy/PubSubToAnyTopic",
"policyDocument": "{\n \"Version\": \"2012-10-17\", \n \"Statement\": [{\n \"Effect\": \"Allow\",\n \"Action\":[\"iot:*\"],\n \"Resource\": [\"*\"]\n }]\n}",
"policyVersionId": "1"
}
Attach the principal policy you just created, using the arn highlighted from earlier:
$ aws iot attach-principal-policy --principal "arn:aws:iot:us-east-1:926342229229:cert/58debbfe90fa58cad4df8426bdf3f20a71df7644437203e231b503b994dfb8f3" --policy-name "PubSubToAnyTopic"
Now, get the endpoint that you'll send data to. This is actually a URL that accepts mqtt data and gets it into Amazon. You will need the endpoint to actually send the data; it will show up in the code as the destination for data.
And you'll get back:
{
"endpointAddress": "yournumberswillbehere.iot.us-east-1.amazonaws.com"
}
Now you have a place to send data to and a policy to handle the data. You created and named a 'thing' and it's ready to use.
But, how the heck can you tell? Go to the AWS management console; you should be getting good with the names of things by now and sign in. Look at the black bar at the top, it should be 'N. Virginia' since we set up as 'us-east-1', but if it isn't use the selection and change it. Also up at the top in the black bar is 'Services' click on it and a huge drop down of services will show up. Choose 'AWS IoT and you should get a screen like this:
There's the policy, thing and endpoint that you created using the steps above. You can click on them and see stuff related to each of them. The thing is where your shadow document will be that you'll be working with going forward.
This posting has taken hours to put together and check over, so I'm going to write about sending data from the Pi up to the thing we just created next time.
